HSE.myUser Guide

HSE.my · PUBLIC USER GUIDE

HSE.my User Guide

Find a task, follow its steps and check the result in your workspace.

START HERE · SYSTEM INTERFACE

Get to know your workspace

These controls work the same way across HSE.my. Start with the navigation, check your working context, then follow the current step on each record. Menus and actions depend on your package, role and assigned organization units.

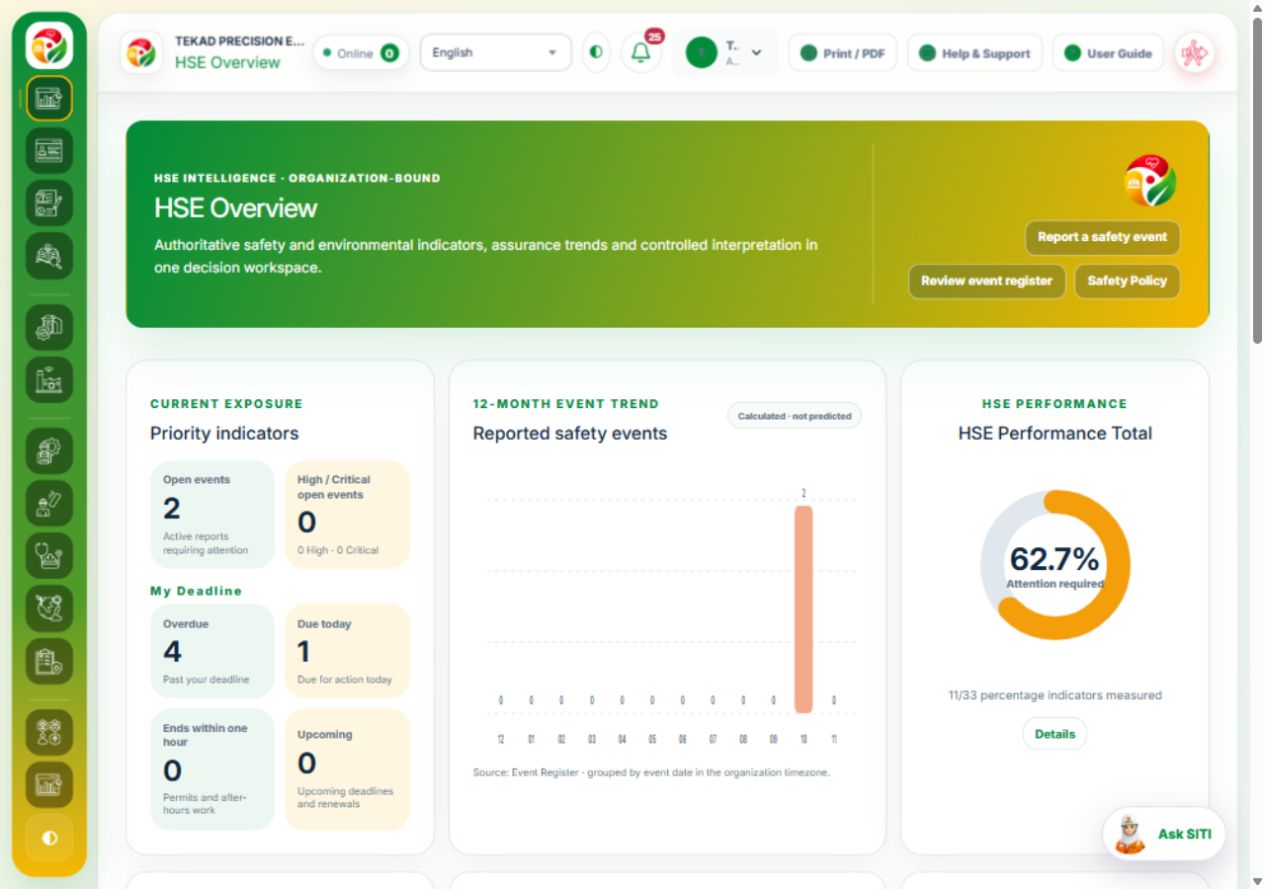
1. Find your way on desktop

Left navigation
Choose an operating domain or industry workspace. Open its grouped menu to find related functions. HSE Overview summarizes records in your authorized scope; My Dashboard focuses on your information and work.
Topbar
Check the organization, current workspace and signed-in profile. Use the language selector and light/dark control. The notification bell opens My Actions; the profile menu provides account options and sign out.
Workspace header
The title identifies where you are. Available actions appear on the right, including Print / PDF where permitted. In an industry workspace, select its edition/profile when available, then the site or unit context.
Cards, charts and maps
Read each label and reporting period. Select linked cards or graph points to open their source records. My Deadline opens the corresponding deadline list in My Actions. A missing value is not the same as zero.
Actual HSE Overview showing the left navigation, topbar, workspace header and linked dashboard cards
Desktop · Navigation, topbar and workspace overview. Select the image to enlarge.

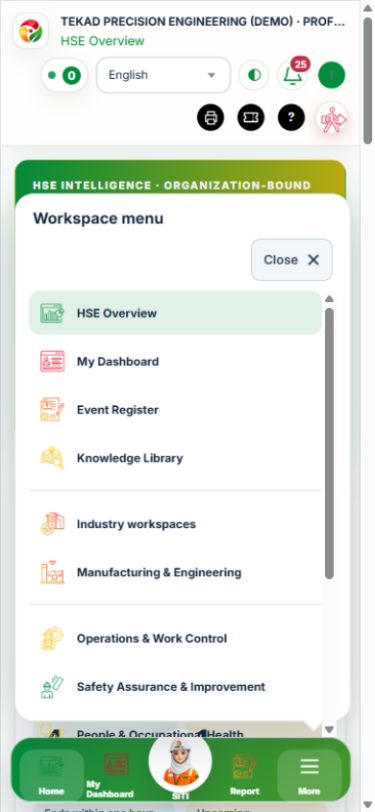
2. Use the same functions on mobile

  1. Use the bottom navigation for Home, My Dashboard and Report where available.
  2. Tap More to open the workspace menu, then choose the domain or module. Close dismisses this menu.
  3. Open grouped menus and tabs inside the workspace to change sections. Shared registers and records stay within the industry workspace; entry and action forms open in a modal.
  4. Registers display labeled record cards on narrow screens. Open the record to see its full details and available actions.
  5. Some topbar labels become icons: printer for Print / PDF, question mark for User Guide and ticket for Help & Support where available.
Continue to the mobile guide →
Actual mobile workspace with the More menu open and bottom navigation visible
Mobile · More opens the workspace menu.

3. Find a record

Set the unit, site, dates or status filters provided. Use Search table to narrow the displayed records, select a column heading to sort, and use the page controls when shown. Open Detail or Open workspace to work on the record. Export CSV/PDF follows the available register controls.

4. Follow the current step

Check the status, current step and assigned person before acting. Complete the required details and use the next available action, such as Submit, Review, Approve or Close. An action may be unavailable because of your role, assignment, package or record state. Independent review must be performed by a different authorized person.

5. Complete forms and evidence

Fields marked * are required. Choose existing records from selectors and attach evidence/GPS in the relevant stage when requested. Select Save, Save step or the stated action and check the result. Closing a form does not save it or close the business record.

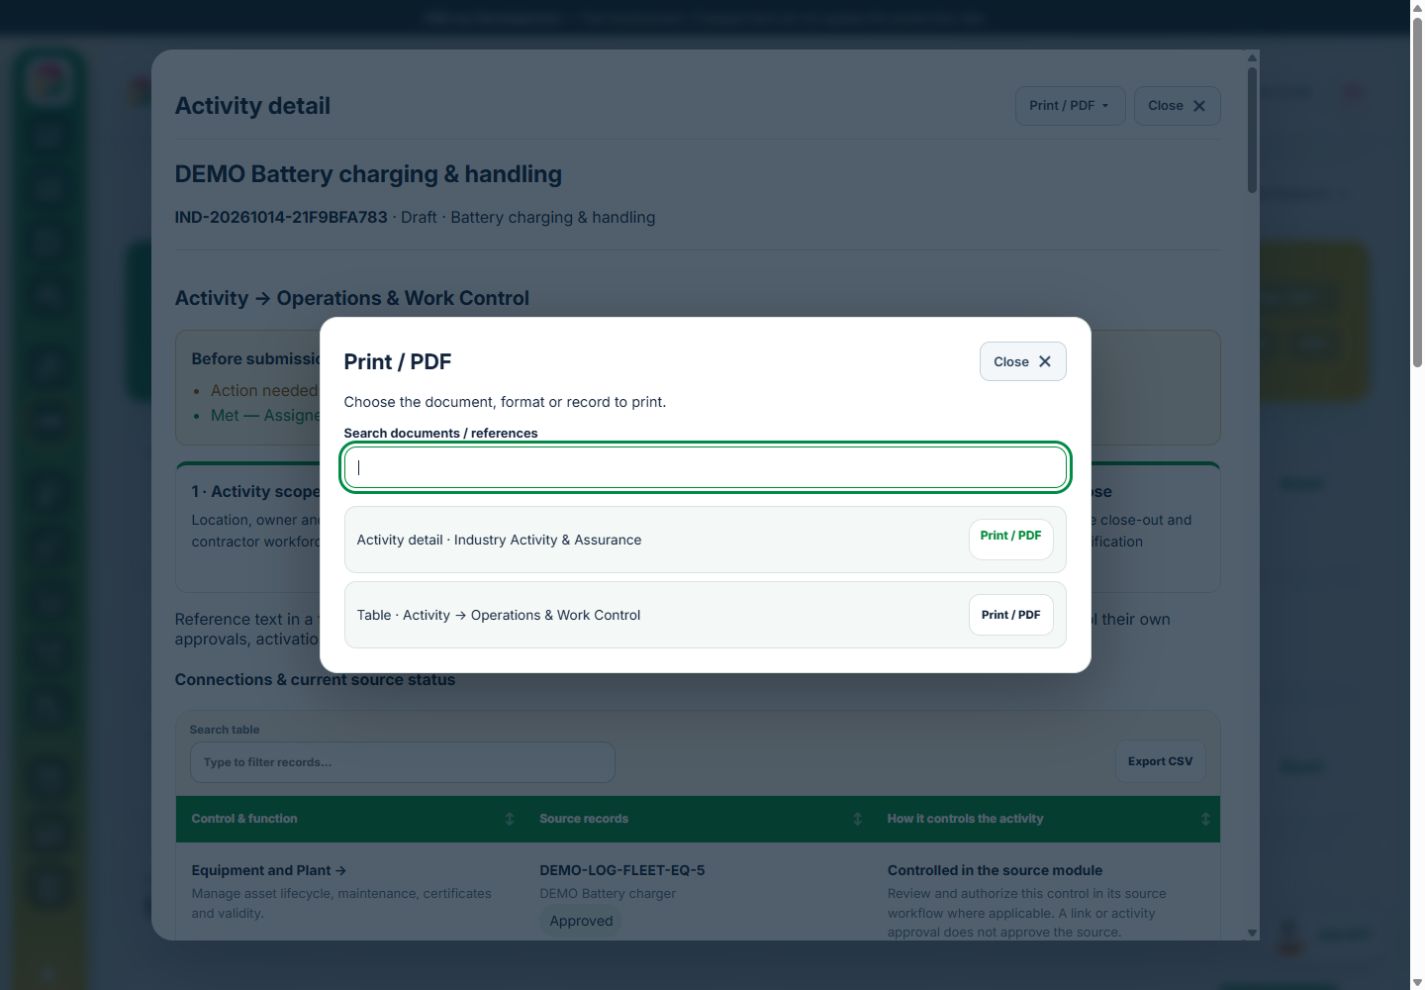
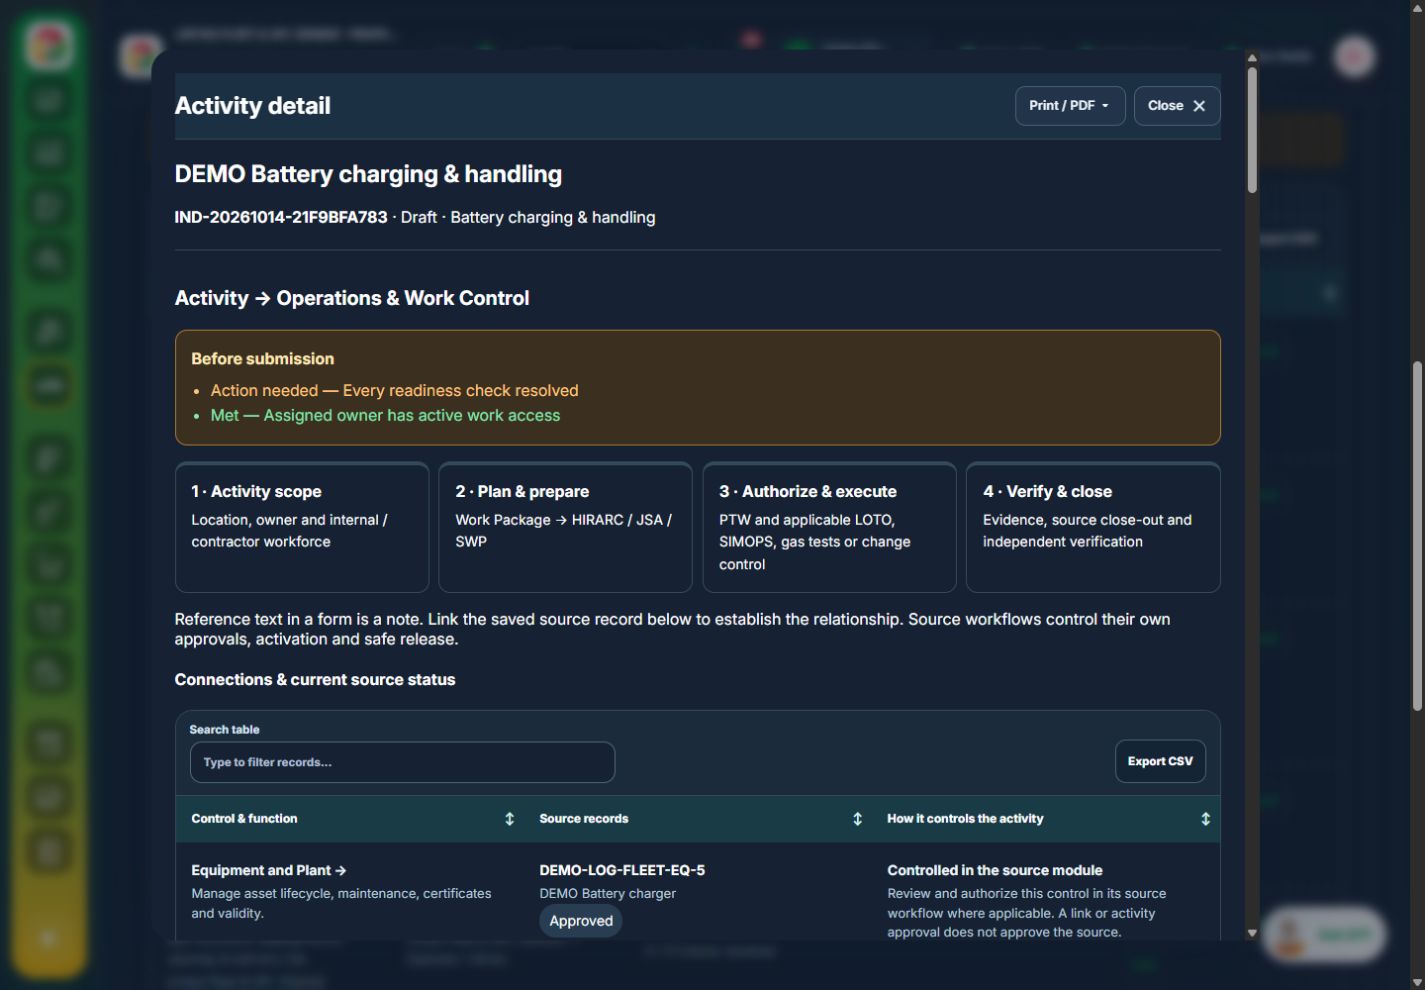
Close and Print / PDF in desktop/mobile forms →

6. Print, get help and follow up

Use Print / PDF in the header, choose the document/format and use its QR to check authenticity. Open User Guide for instructions, My Actions for assigned tasks/reminders and SITI for assistance where available. Logged-in users can open Help & Support to raise a ticket.

Document printing and public QR verification → · Notification preferences →

Ready to begin? Choose a quick-start task, browse operating domains or find your industry guide.

QUICK START

Choose a task

OPERATING DOMAINS

Follow the HSE work cycle

Choose the stage that matches your task. For an active hazard, go directly to response and investigation.

  1. Stage 1 Set up the organization and responsibilities
  2. Stage 2 Identify hazards and assess exposure
  3. Stage 3 Prepare people, equipment and controls
  4. Stage 4 Plan, authorize and carry out the work
  5. Stage 5 Inspect and monitor performance
  6. Stage 6 Respond, investigate and verify corrective action
  7. Stage 7 Audit, report and improve

Industry workspaces and specialist guides

Account access

Register, invite your team and sign in

STEP 1 OF 3

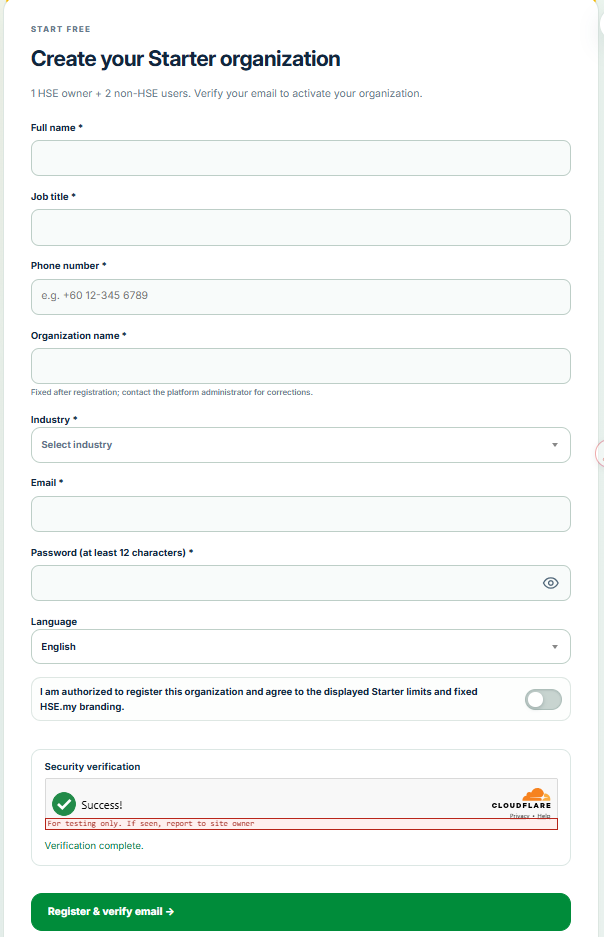
Register and verify your email

  1. Open Explore Packages and choose Starter registration.
  2. Enter the organization and account details, complete security verification and submit.
  3. Open the verification email and select Confirm my email.
Create your Starter organization · Registration form

STEP 2 OF 3

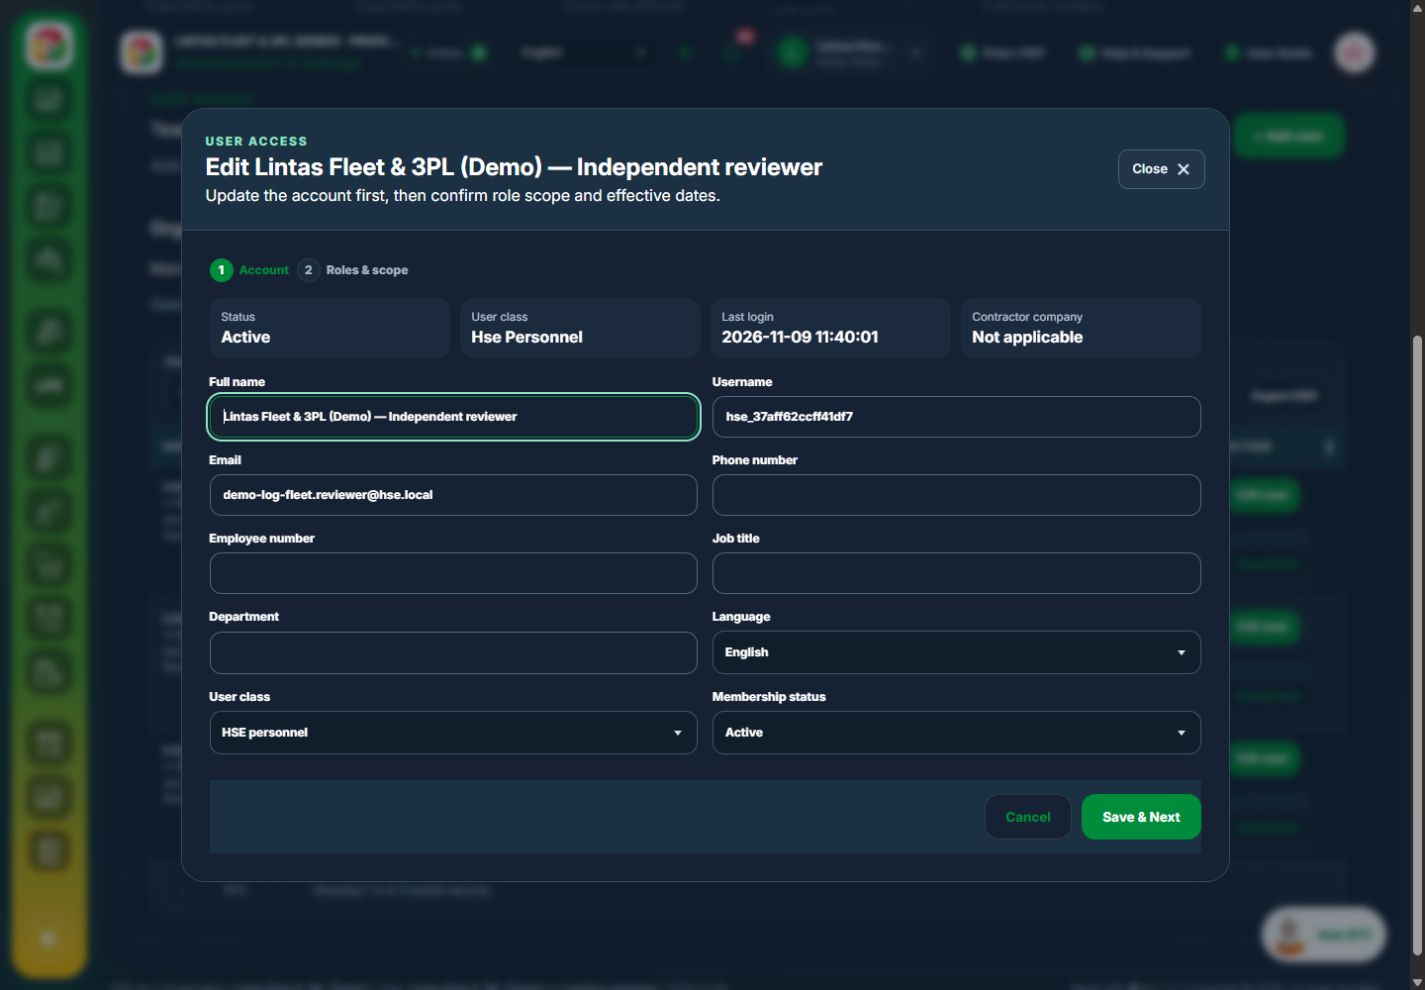
Add a user and send the invitation

  1. Open Administration → Users, or Team & workers for Starter.
  2. Enter the person’s email, choose their role and assign their unit or site.
  3. Saving the user sends the invitation.
  4. On Starter, choose Operations / Action Owner or Manager / Independent Reviewer as appropriate.
Add user and assign access

STEP 3 OF 3

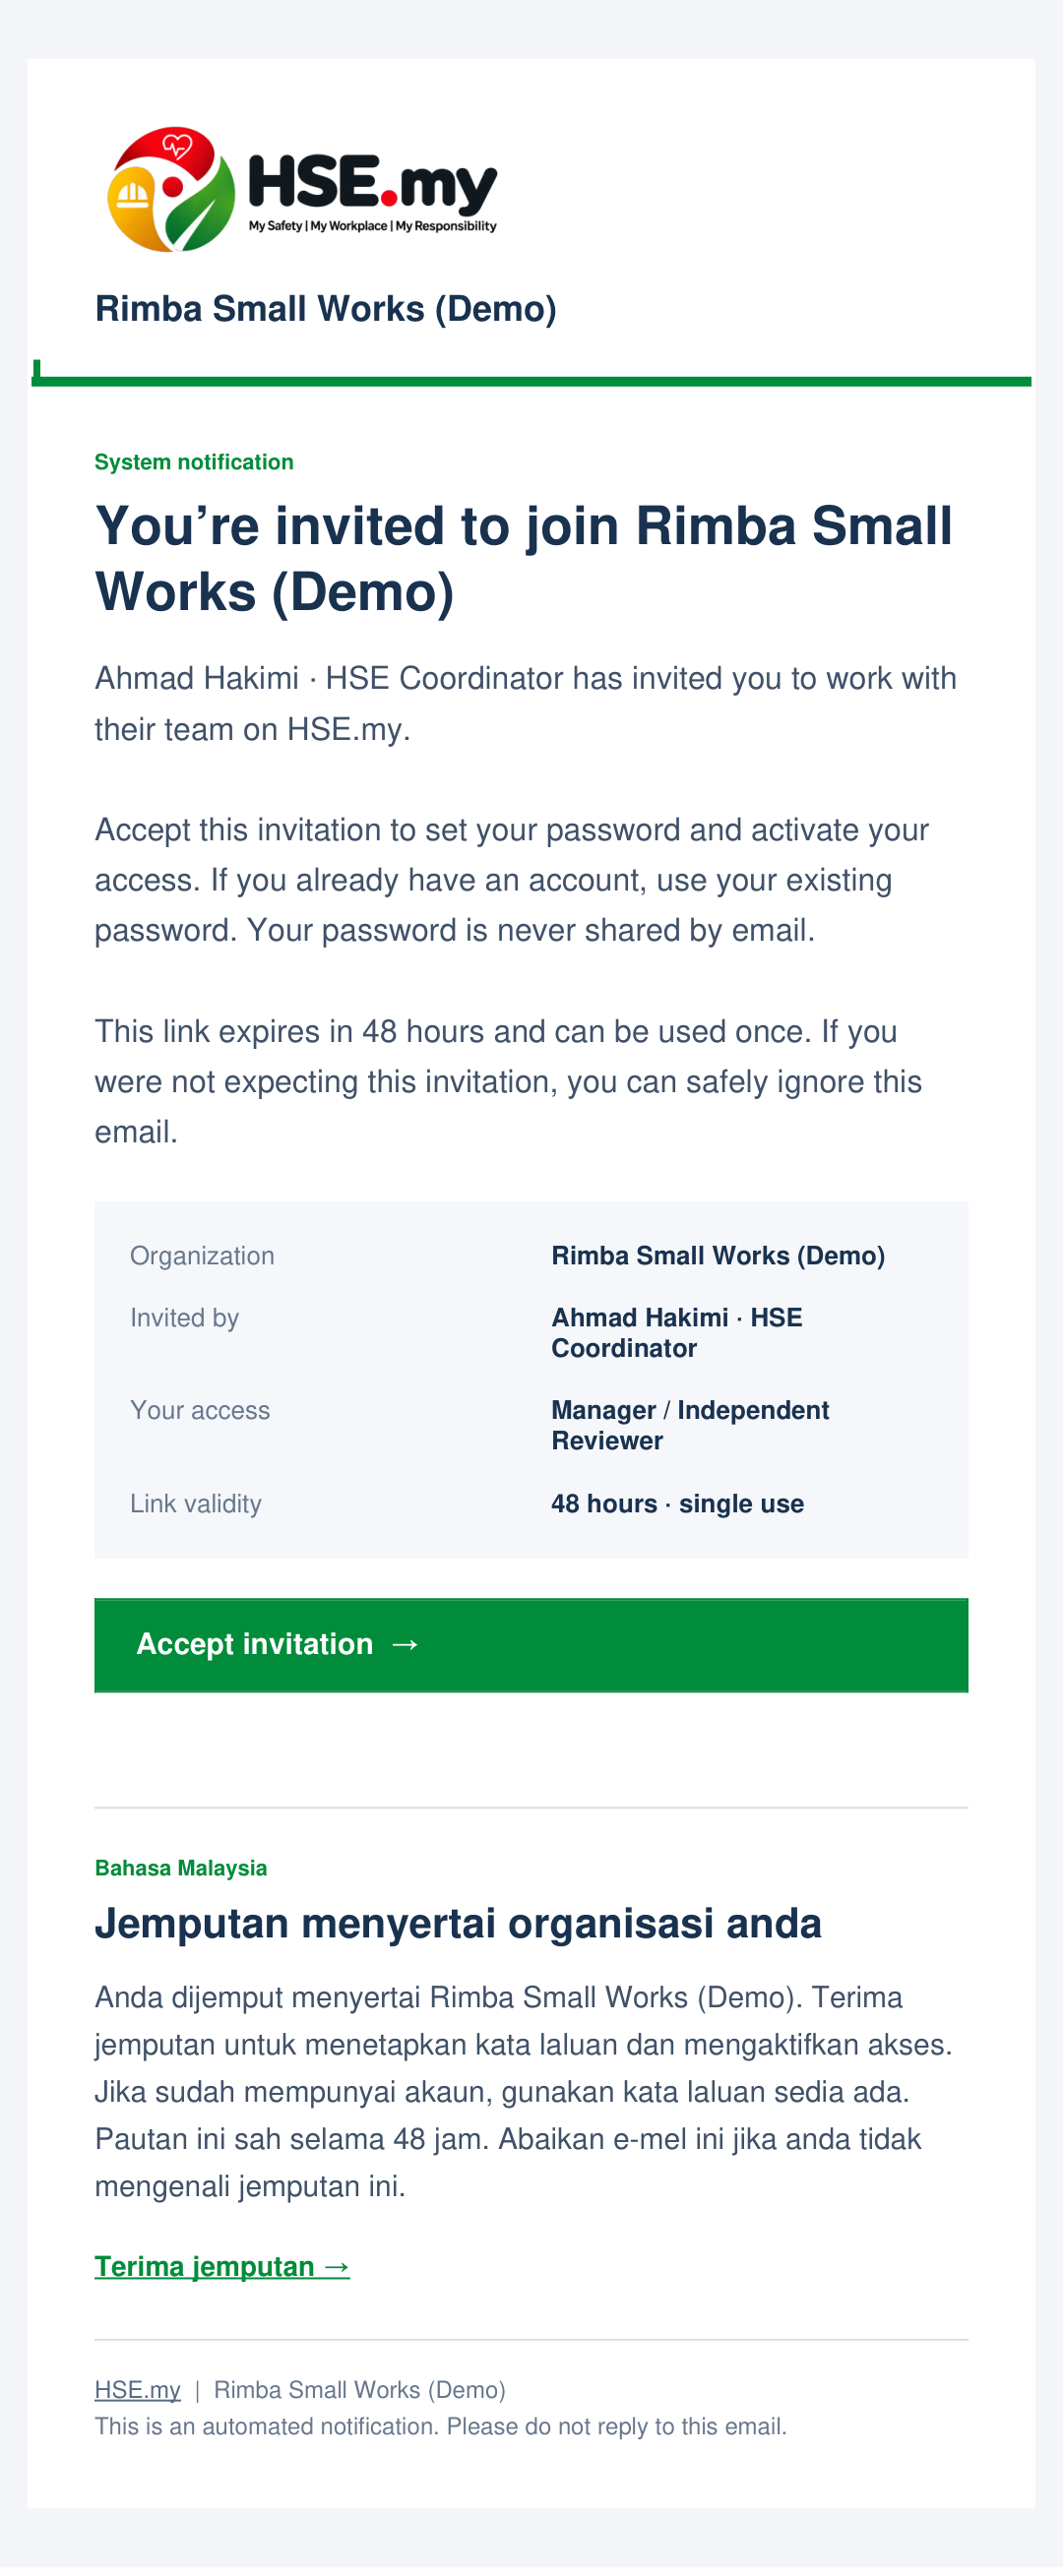
Accept the invitation and sign in

  1. Open the invitation email and follow its acceptance link.
  2. New users choose a password.
  3. Existing users confirm their password.
  4. Sign in, complete security verification and accept the Terms & Conditions when prompted.
  5. Check the organization and role on My Dashboard.
  6. If the invitation has expired, ask the administrator to resend it.
Example of the invitation email

Safety

Report an event and close the case

STEP 1 OF 7

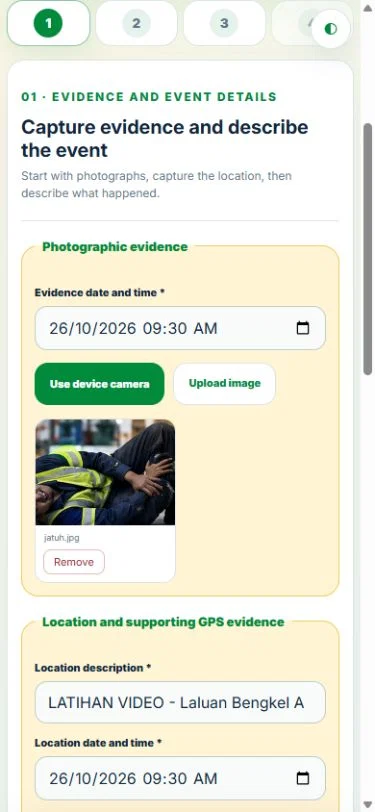
Report the event

  1. Select Report an event.
  2. Enter what happened, when and where, add the location and evidence requested, and submit.
  3. Keep the reference to check report status.
Mobile event report and evidence

STEP 2 OF 7

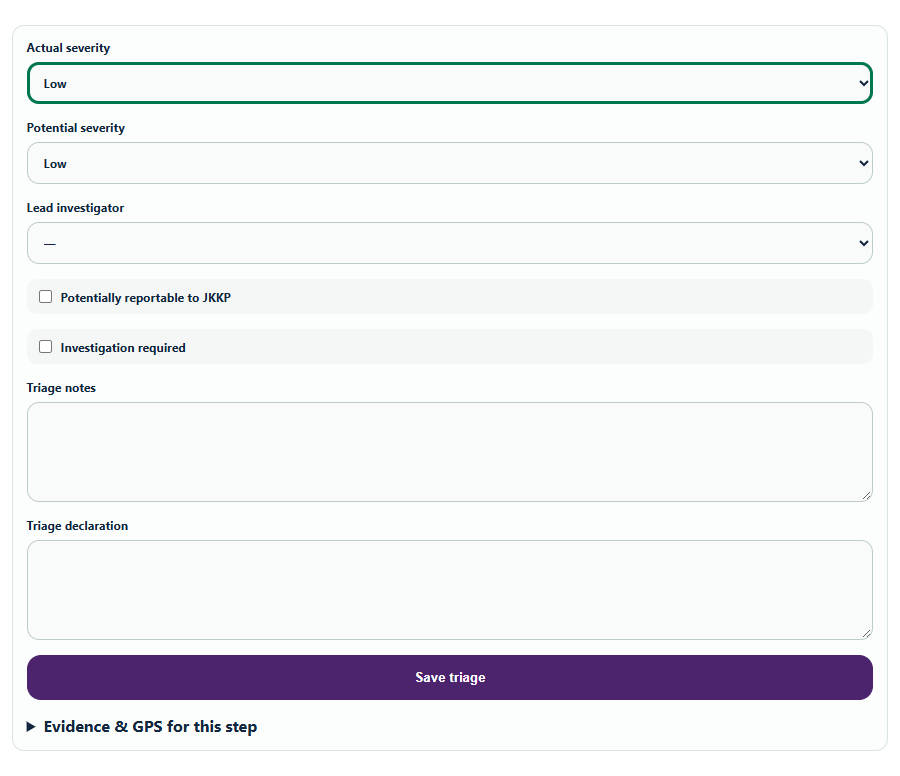
Record the triage

  1. Open Safety → Event Register and open the case.
  2. In Triage & review decision, choose actual and potential severity.
  3. Select a lead investigator where required, complete the investigation and reportability checks, then enter the notes and declaration.
  4. Choose Save triage.
Record the triage · Event Case form

STEP 3 OF 7

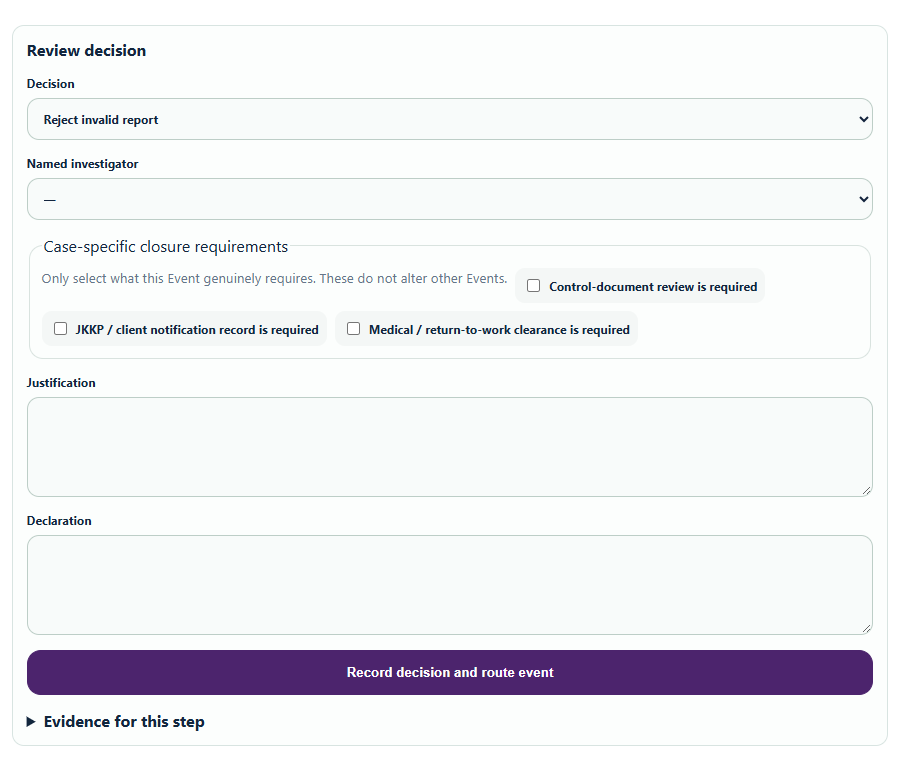
Decide the next action

  1. In Review decision, select the route and the named investigator if required.
  2. Select the closure requirements applicable to this event.
  3. Enter your justification and declaration, then choose Record decision and route event.
Decide the next action · Event Case form

STEP 4 OF 7

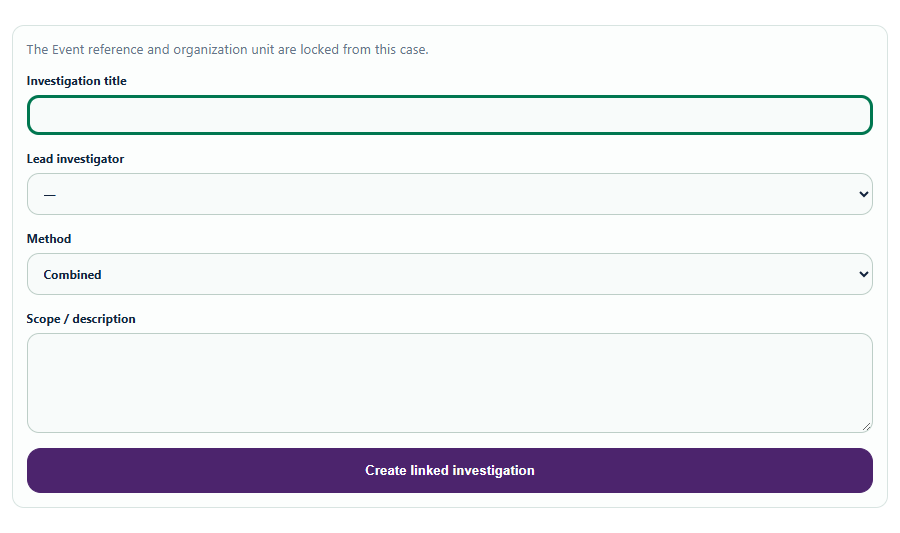
Create the linked investigation when required

  1. Open Investigation on the case.
  2. Enter the investigation title, select the lead investigator and method, and describe the scope.
  3. Choose Create linked investigation.
  4. The assigned investigator opens the linked record to record findings, causes and supporting evidence.
Create the linked investigation when required · Event Case form

STEP 5 OF 7

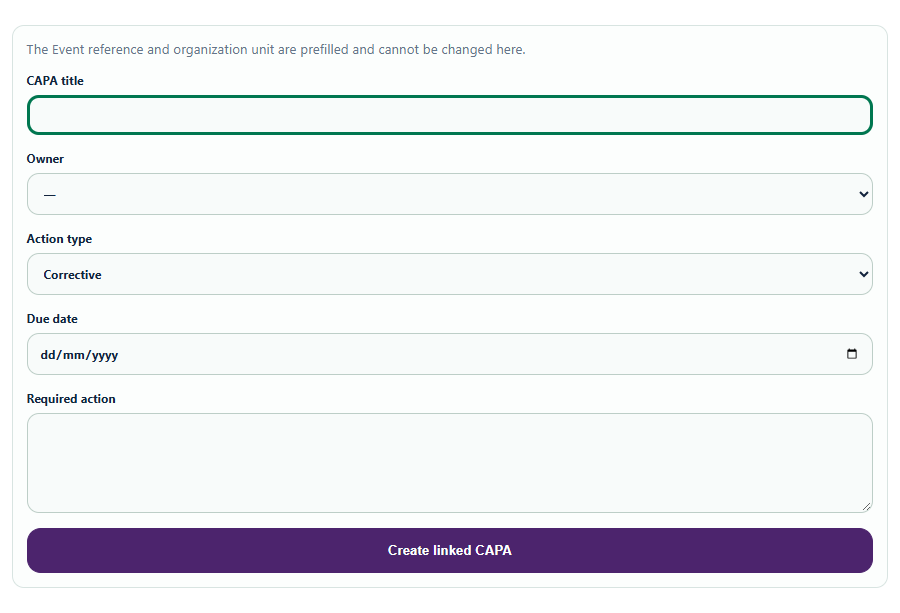
Assign and verify corrective actions

  1. Open CAPA & linked follow-up.
  2. Enter the corrective action, responsible owner and due date, then create the linked CAPA.
  3. The owner records implementation and evidence in that record.
  4. A different authorized verifier checks effectiveness and records the outcome.
Assign and verify corrective actions · Event Case form

STEP 6 OF 7

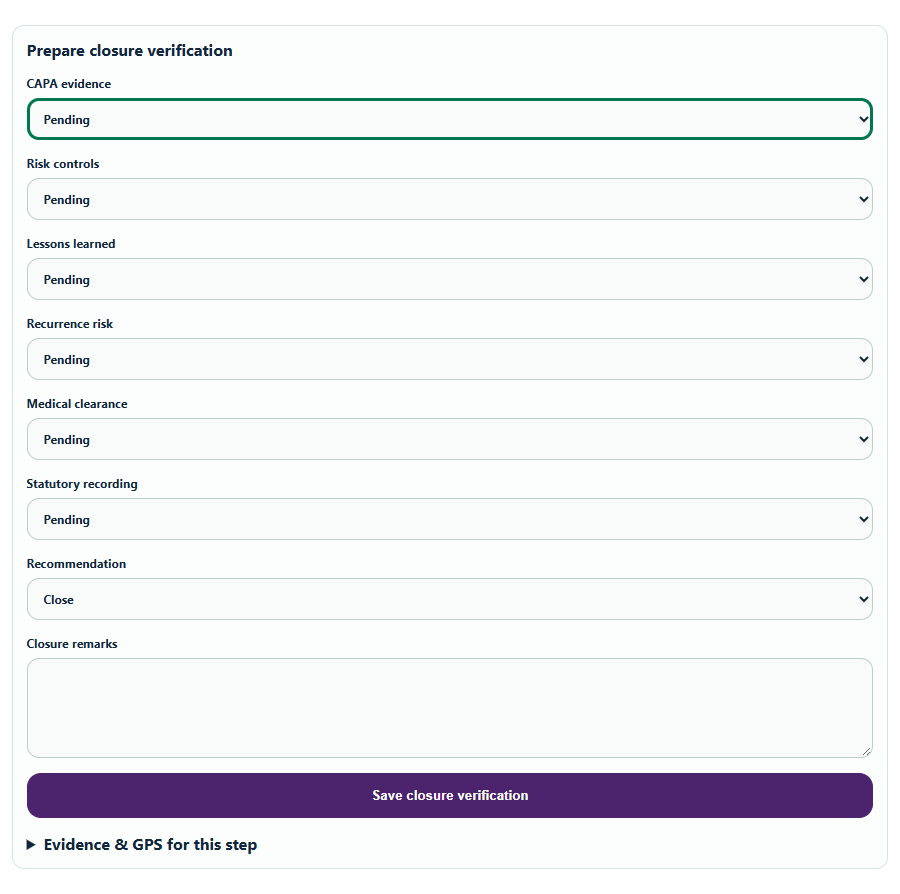
Verify readiness for closure

  1. Open Closure verification & sign-off as the verifier.
  2. Check the evidence, linked CAPA and other requirements for this case.
  3. Record your recommendation and closure remarks.
  4. Choose Save closure verification.
  5. Resolve any outstanding items before recommending closure.
Verify readiness for closure · Event Case form

STEP 7 OF 7

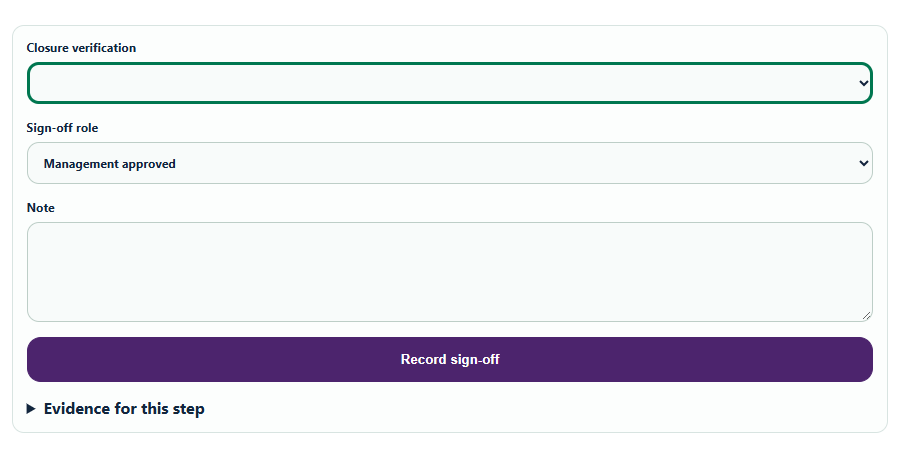
Record sign-off and confirm closure

  1. As the authorized signatory, select the saved closure verification and your sign-off role.
  2. Enter the note and choose Record sign-off.
  3. Complete the case closure action when the workflow permits it.
  4. Check the event status is Closed.
Record sign-off and confirm closure · Event Case form

Operations

Prepare a work package and close its permit

STEP 1 OF 13

Prepare the contractor and work party

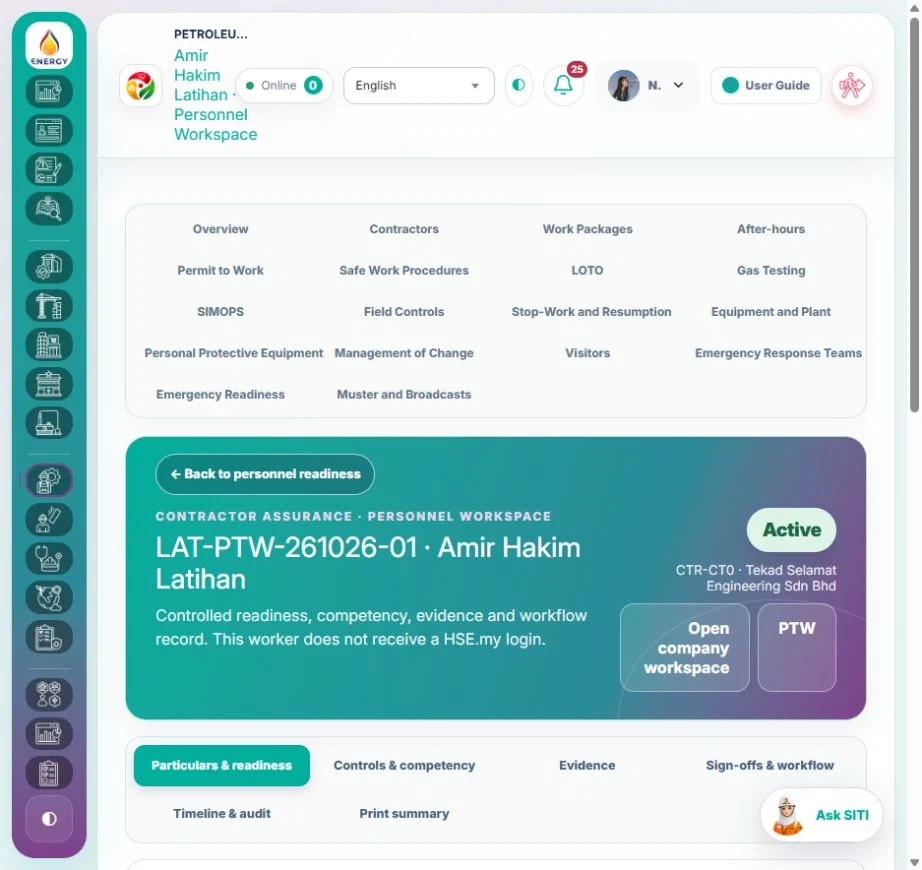
  1. Register the contractor company and engagement.
  2. Add the workers, assign the site and check required competencies, induction and fitness before selecting the work party.
Contractor worker readiness

STEP 2 OF 13

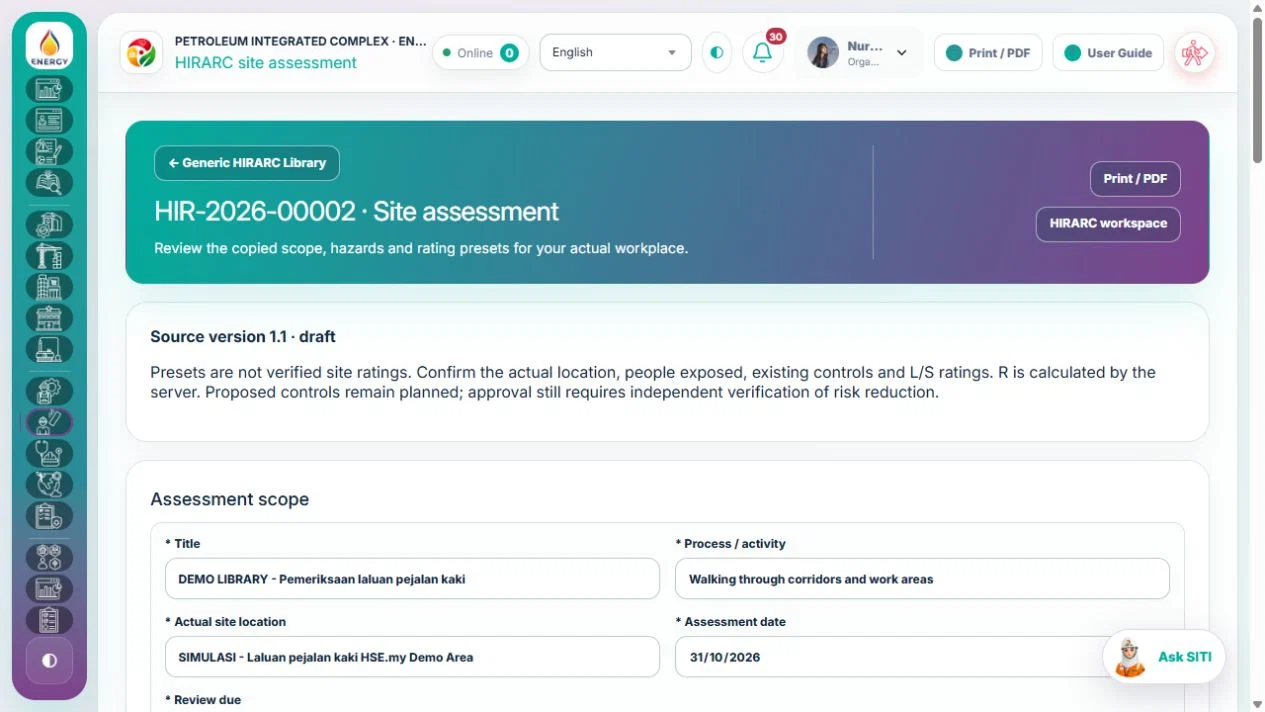
Prepare the site HIRARC

  1. Define the activity and location.
  2. Add hazards manually or choose them from the HIRARC Library.
  3. Confirm existing site controls, review likelihood and severity and check the risk score.
  4. Record further controls, their owners and the residual risk.
  5. Submit for verification, review and approval.
Site assessment with initial and residual risk ratings

STEP 3 OF 13

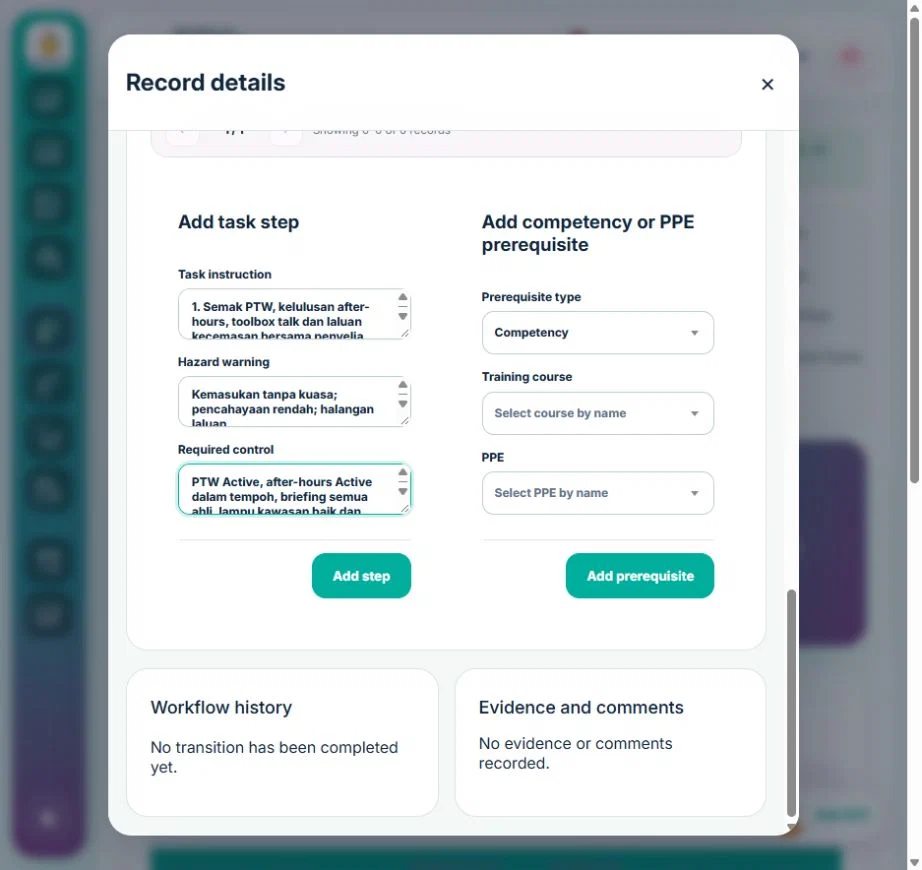
Prepare the safe work procedure where required

  1. Use the assessed hazards to write the work sequence, required competencies, protective equipment and emergency arrangements.
  2. Submit the procedure for review and use its approved revision when preparing the JSA.
Safe work procedure steps

STEP 4 OF 13

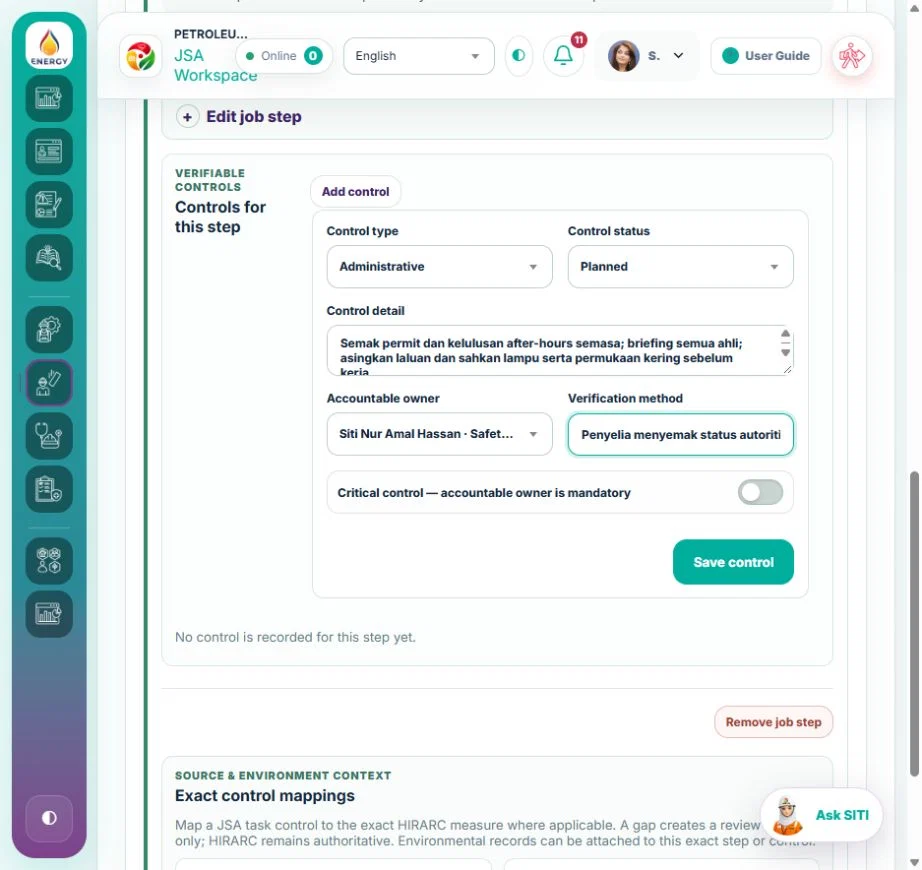
Prepare and approve the JSA

  1. Break the job into steps in Safety → JSA.
  2. For each step, identify what could go wrong, specify the controls and identify who will apply them.
  3. Check the JSA against the site HIRARC and applicable procedure.
  4. Resolve readiness gaps, then submit for review and approval.
Controls for a job step in the JSA

STEP 5 OF 13

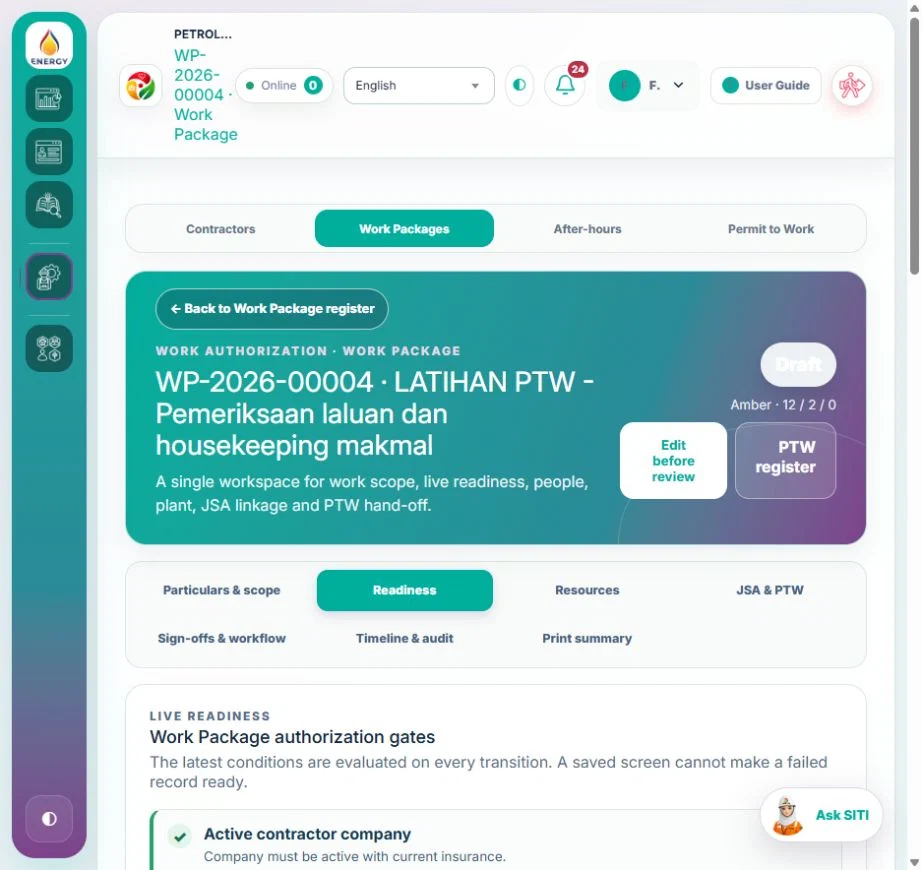
Prepare and activate the work package

  1. Define the scope, location and work window.
  2. Assign workers and equipment.
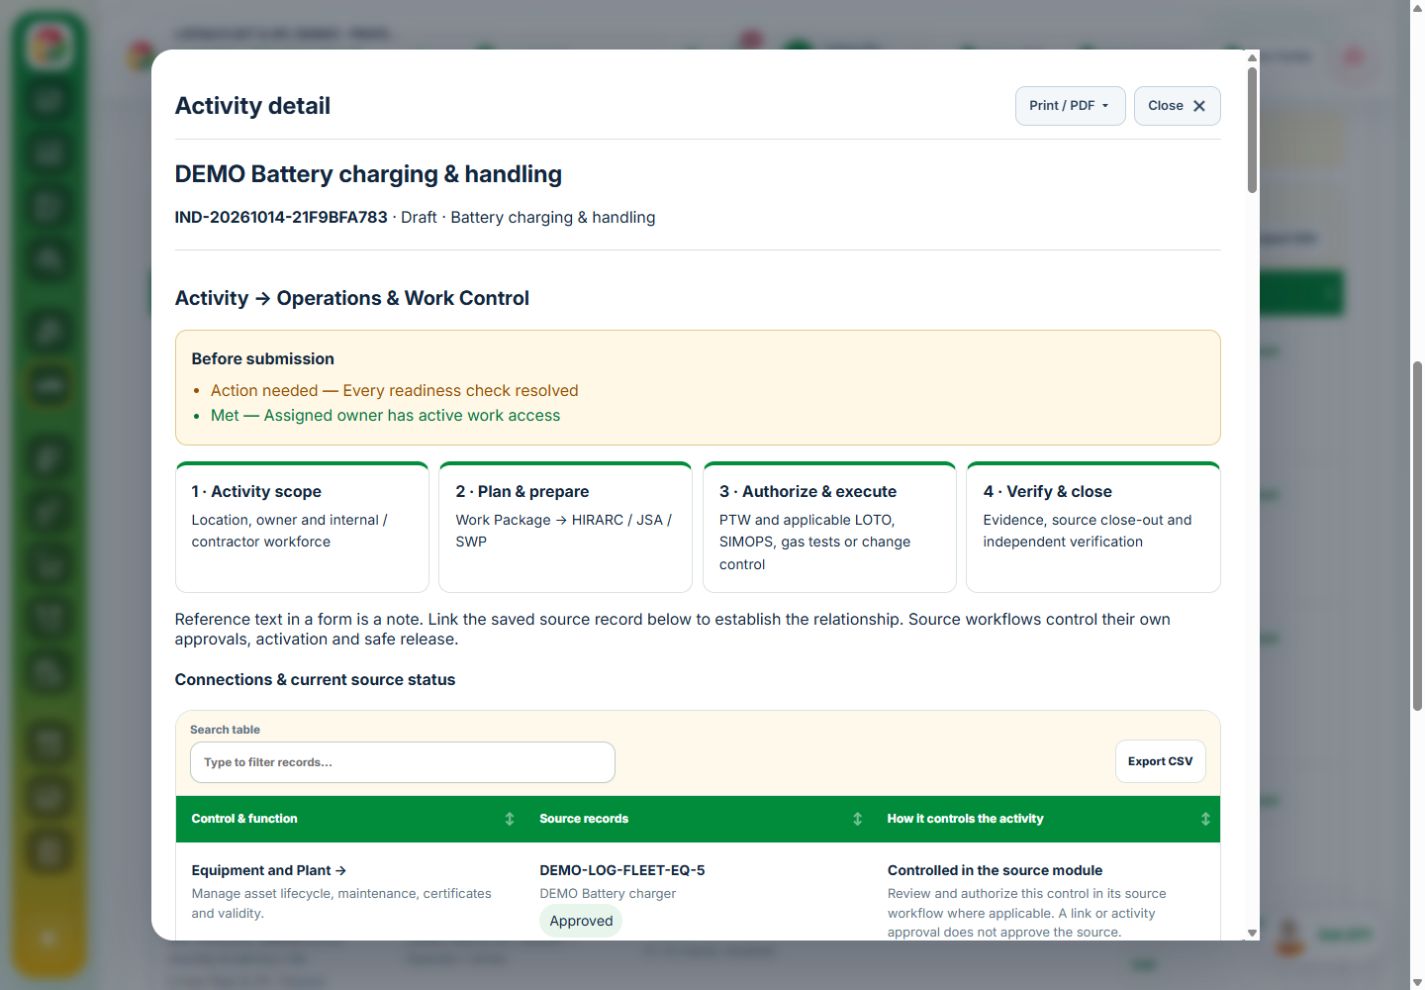
  3. Link the applicable HIRARC, JSA and safe work procedure.
  4. Resolve readiness gaps, submit for review and activate the approved package.
Work package readiness checks

STEP 6 OF 13

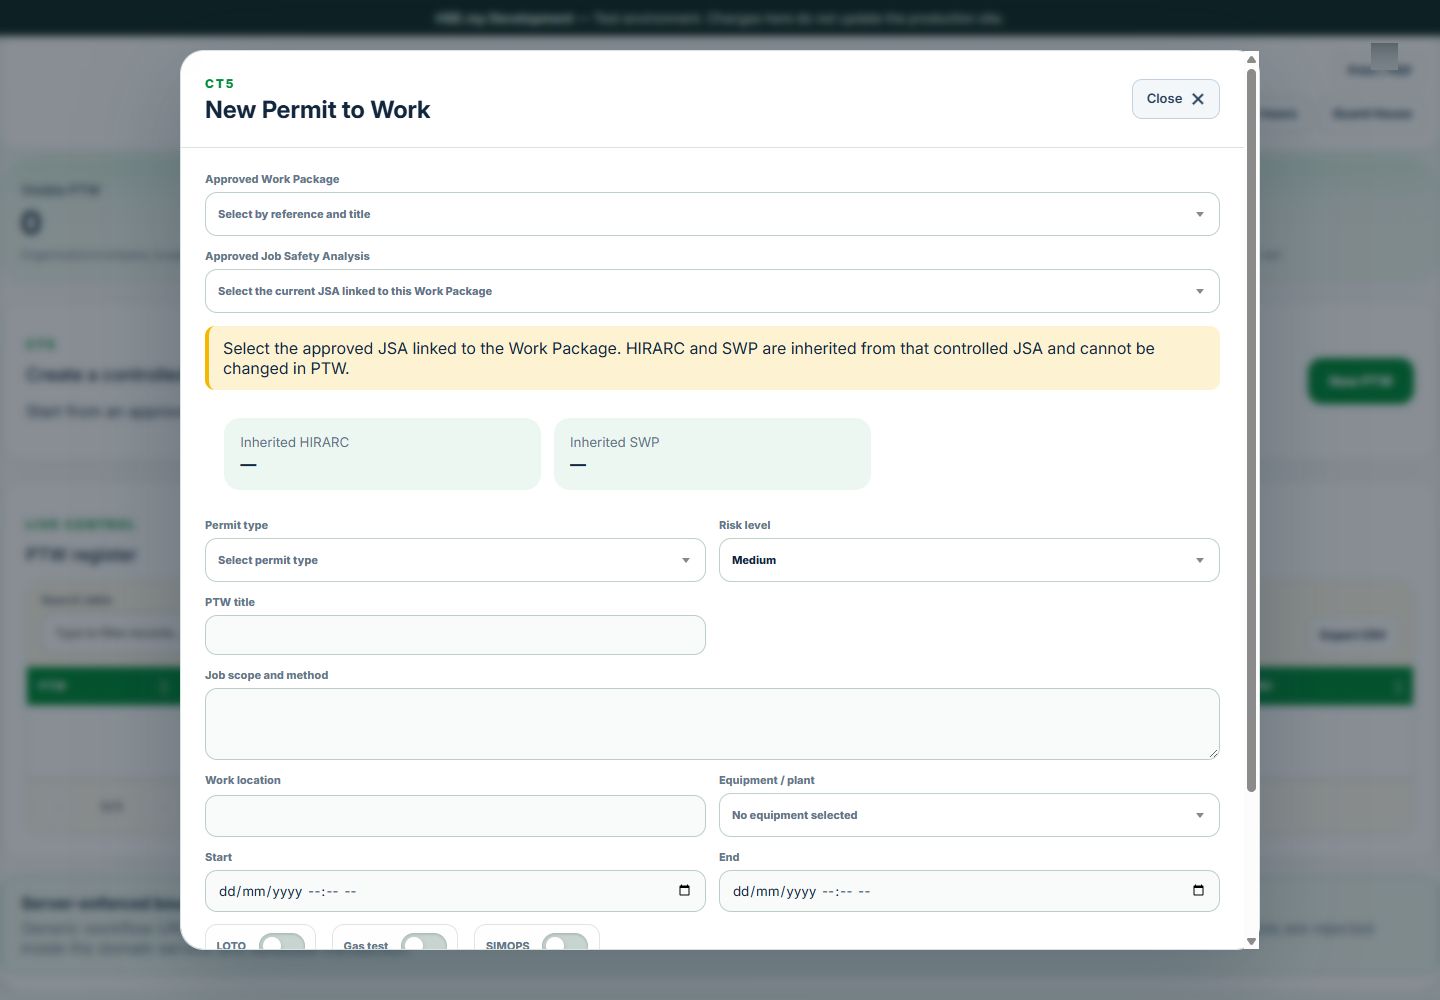
Apply for the permit

  1. Open Permit to Work and create a permit for the active work package.
  2. Select the work location and permit type.
  3. Enter the planned start and finish within the authorized window.
  4. Check the linked risk assessment, JSA and work party.
  5. Complete the permit controls applicable to the task and submit the application.
New Permit to Work · Application and linked work scope

STEP 7 OF 13

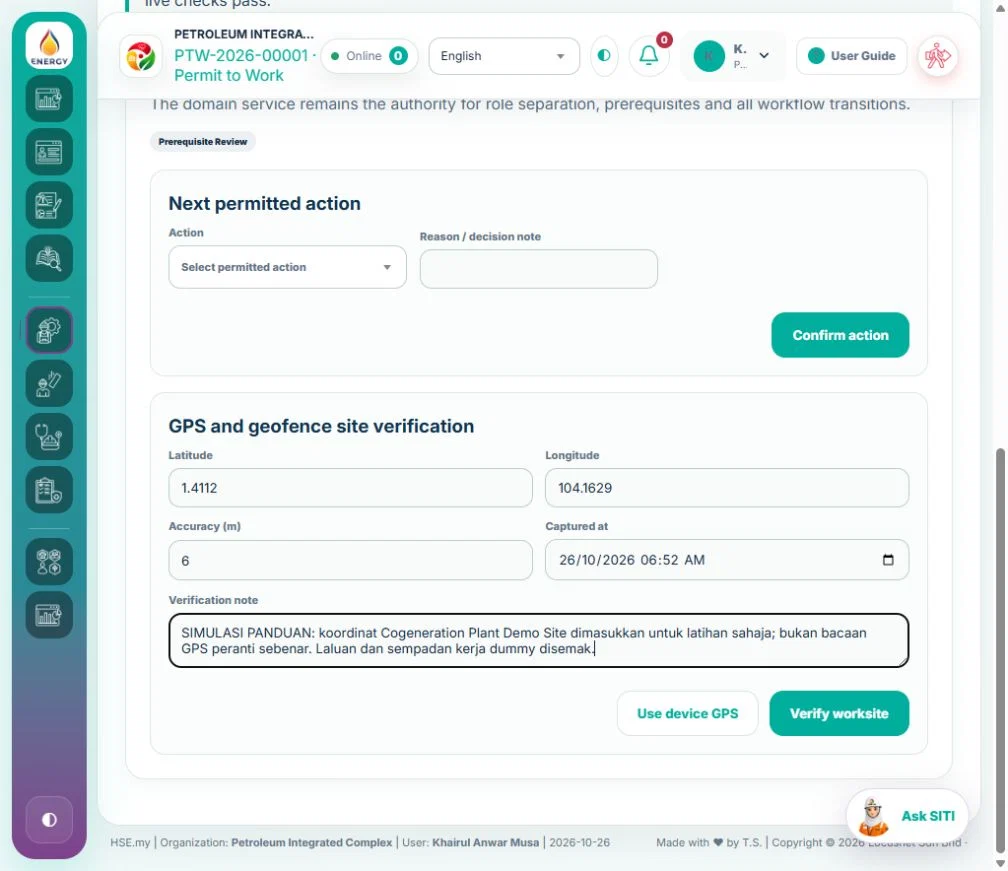
Verify the site and obtain approval

  1. Open the submitted permit as the assigned verifier.
  2. Check the site conditions against the application, including isolations and gas test results where required.
  3. Record the findings.
  4. The issuer and area approver review the permit in their assigned stages.
  5. Check the permit status and any outstanding conditions before proceeding.
Site verification before permit issue

STEP 8 OF 13

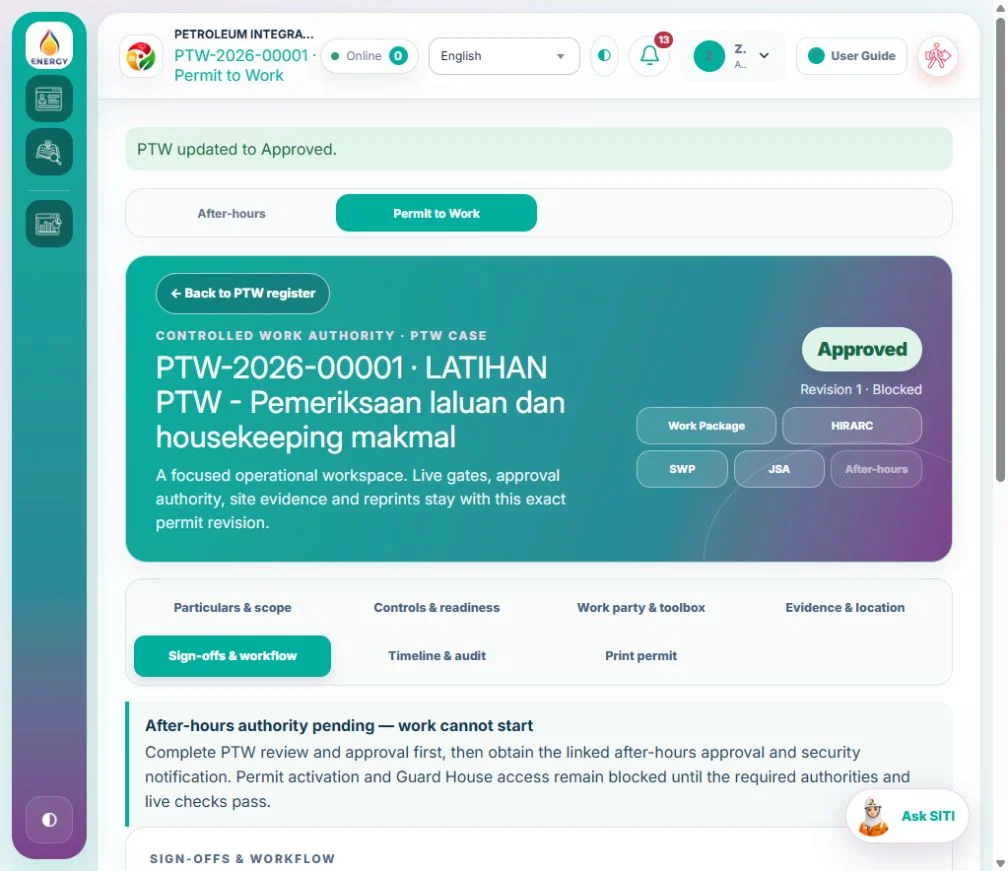
Arrange after-hours approval when required

  1. Open After-hours and select the relevant work package.
  2. Enter the requested window, work party, supervisor and reason for working outside normal hours.
  3. Submit for the assigned approver to review.
  4. Check the approved window covers the planned work before activation.
Approved permit awaiting after-hours clearance

STEP 9 OF 13

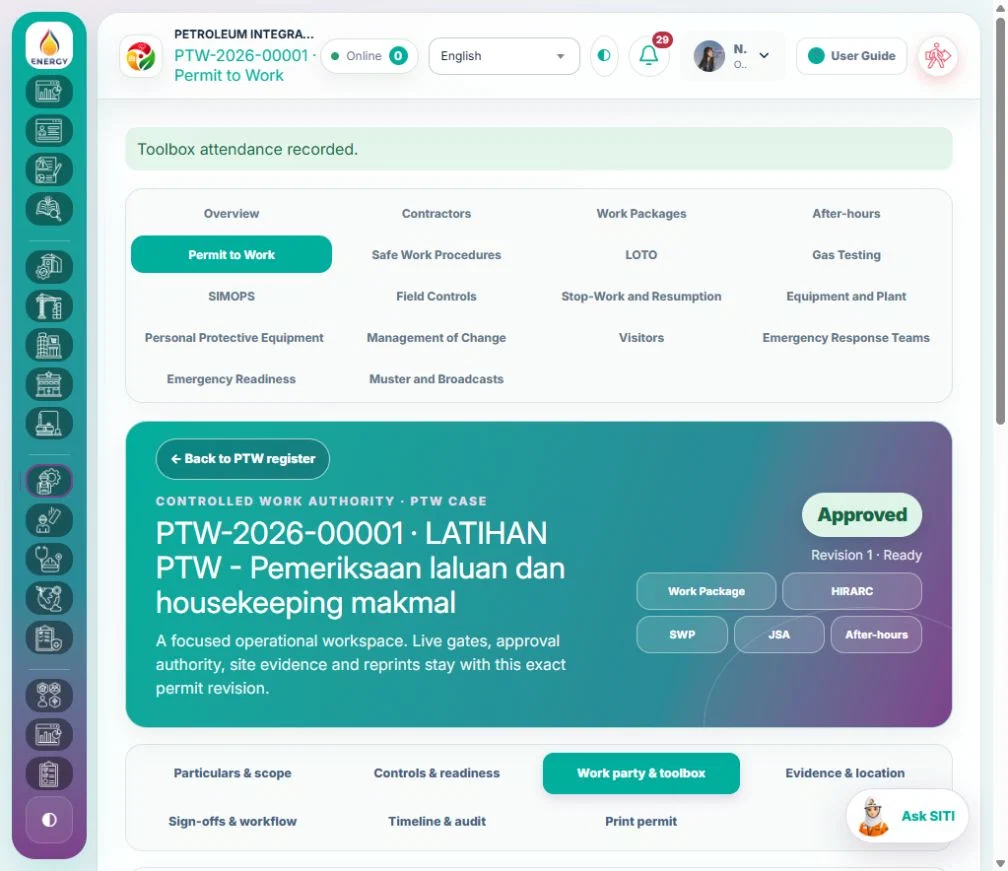
Brief the crew and activate the permit

  1. Open the toolbox briefing for the work party.
  2. Review the JSA steps, controls, stop-work conditions and emergency arrangements with the workers.
  3. Record attendance.
  4. Issue the permit QR once the required checks are complete.
  5. Activate the permit and confirm the status and validity window before starting.
Recorded toolbox briefing and attendance

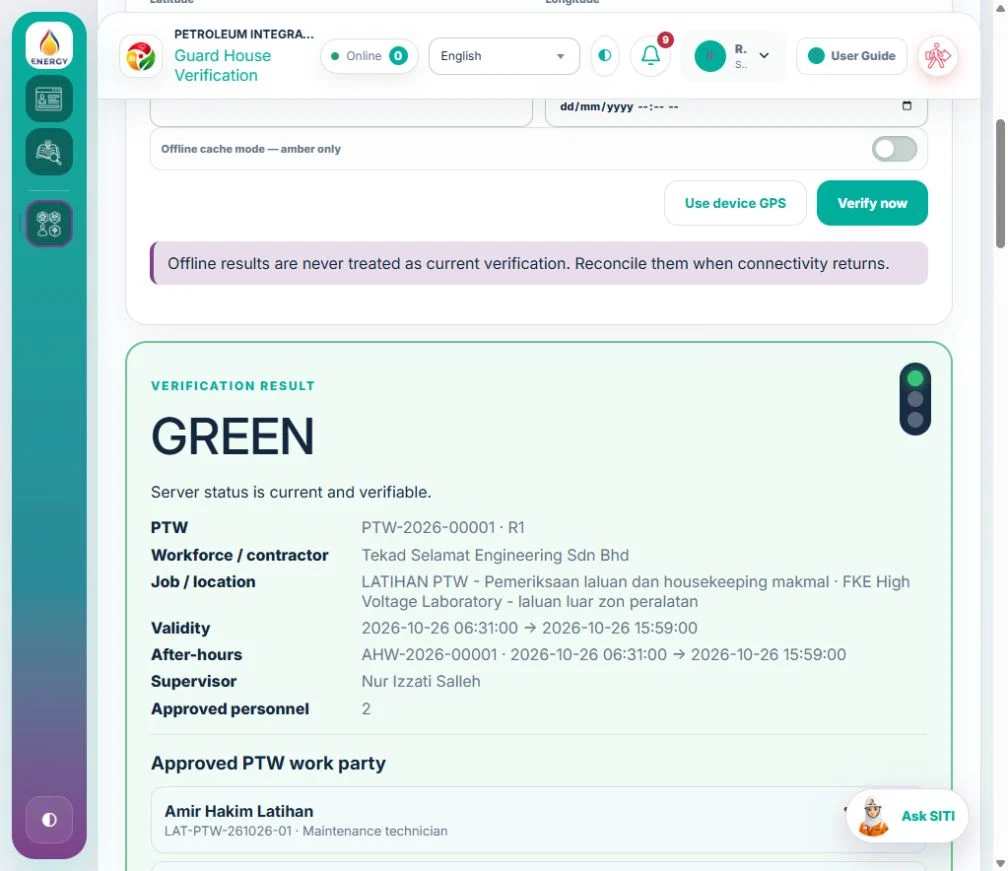
STEP 10 OF 13

Check the permit at the gate

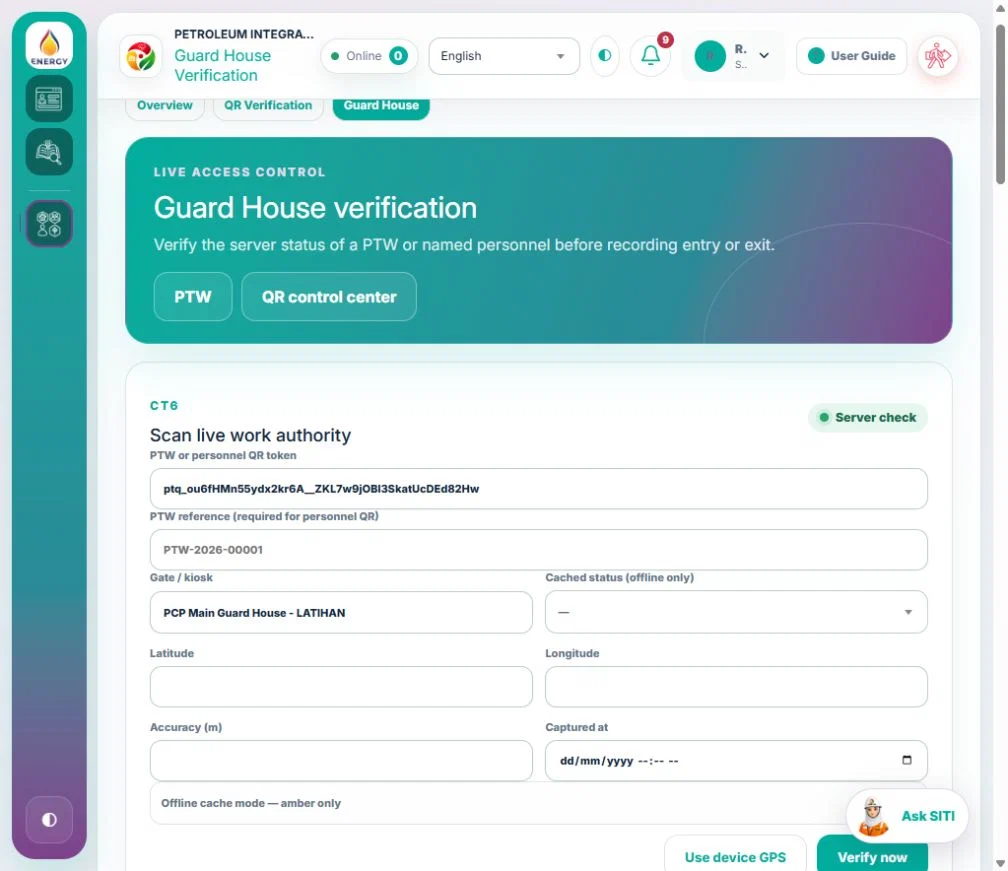
  1. In Guard House on mobile, scan the permit QR.
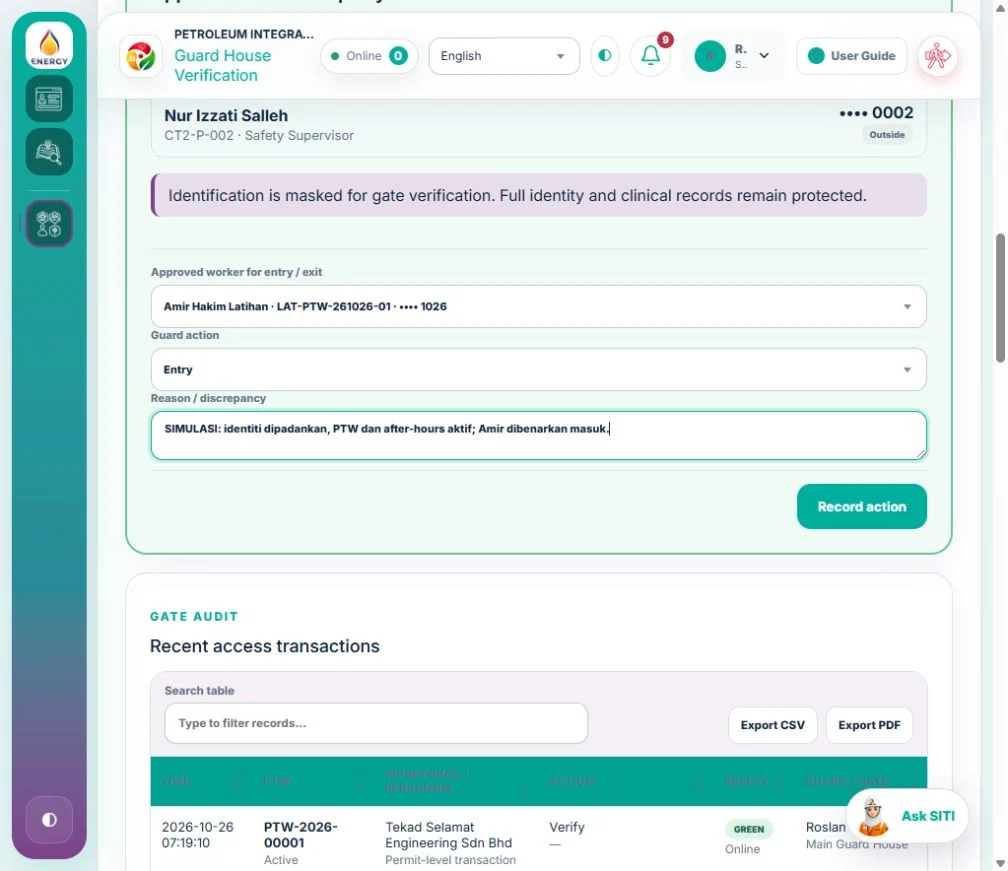
  2. Check validity, the work window and the authorized work party before recording entry or exit.
Mobile guard house verification

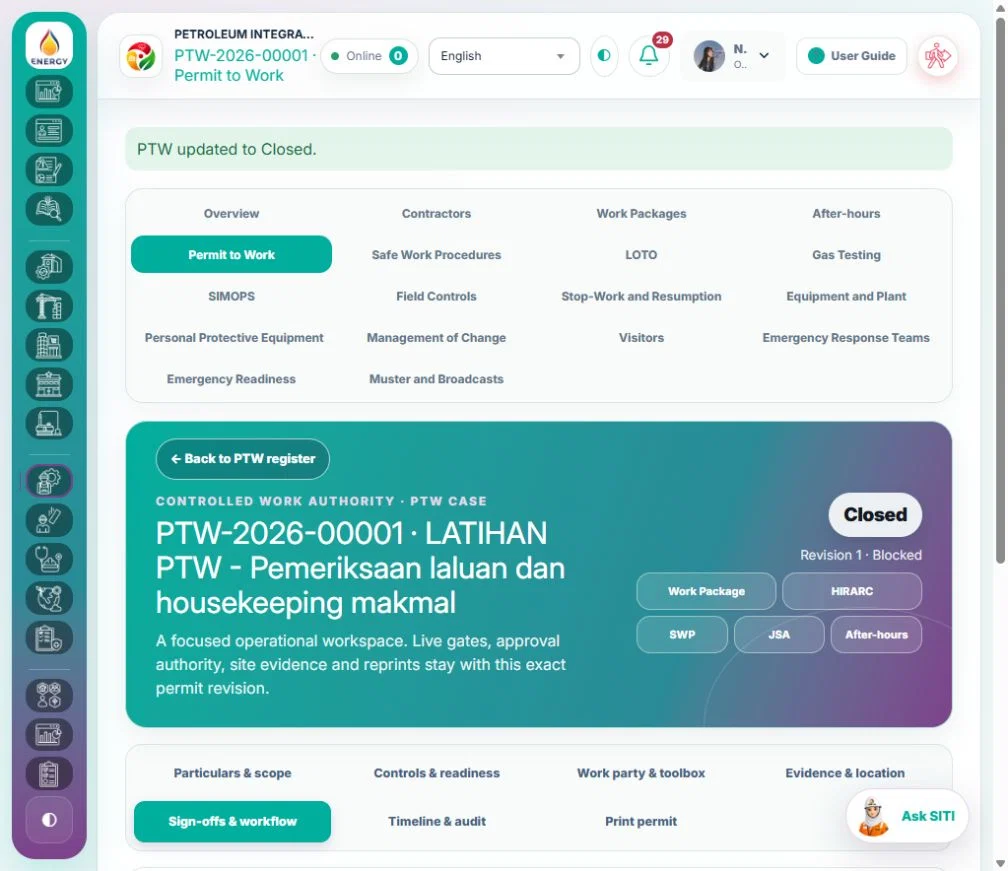
STEP 11 OF 13

Hand back the site and close the permit

  1. At the end of the job, stop work and account for the crew.
  2. Record the condition of the area, outstanding hazards and handback evidence.
  3. Request permit closure.
  4. The authorized verifier checks the handback and records the decision.
  5. Confirm the permit shows Closed.
Closed permit after handback

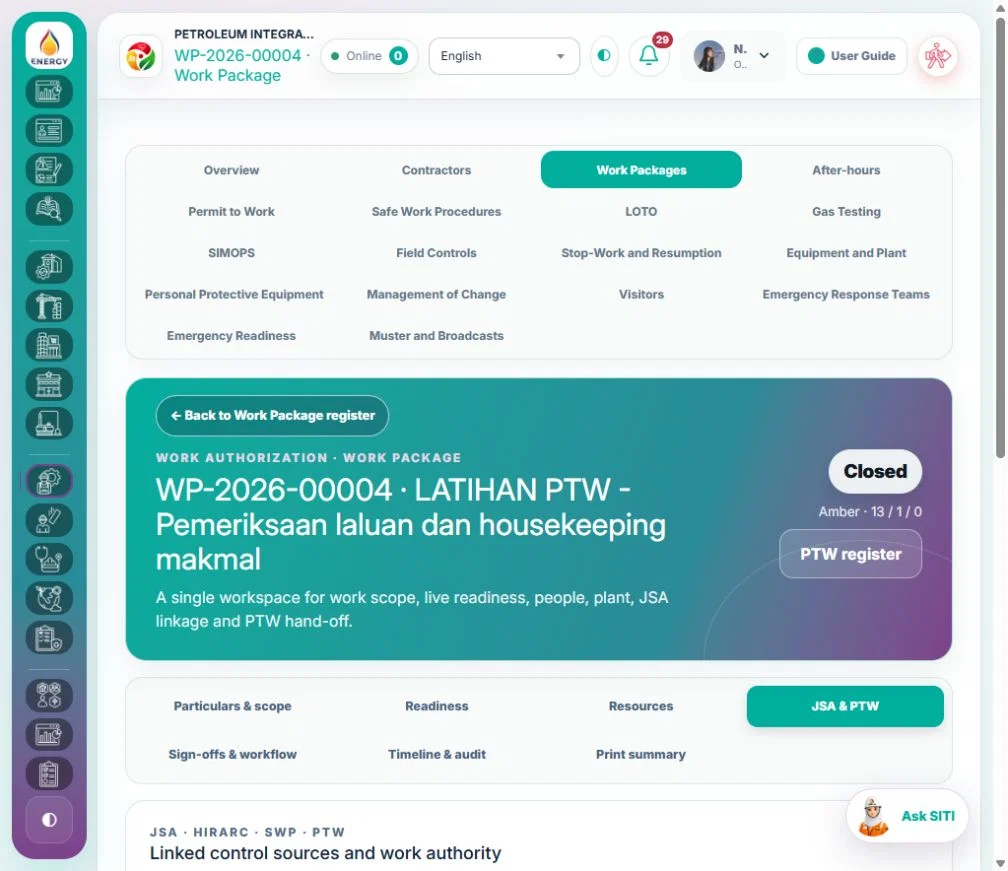
STEP 12 OF 13

Complete and close the work package

  1. Reopen the linked work package.
  2. Check the work scope has been completed and verify the status of every linked permit.
  3. Resolve any remaining handback items.
  4. Record completion and submit or perform the closure action available to your role.
  5. Confirm the package shows Closed.
Work package with closed linked records

STEP 13 OF 13

Print the permit or work package

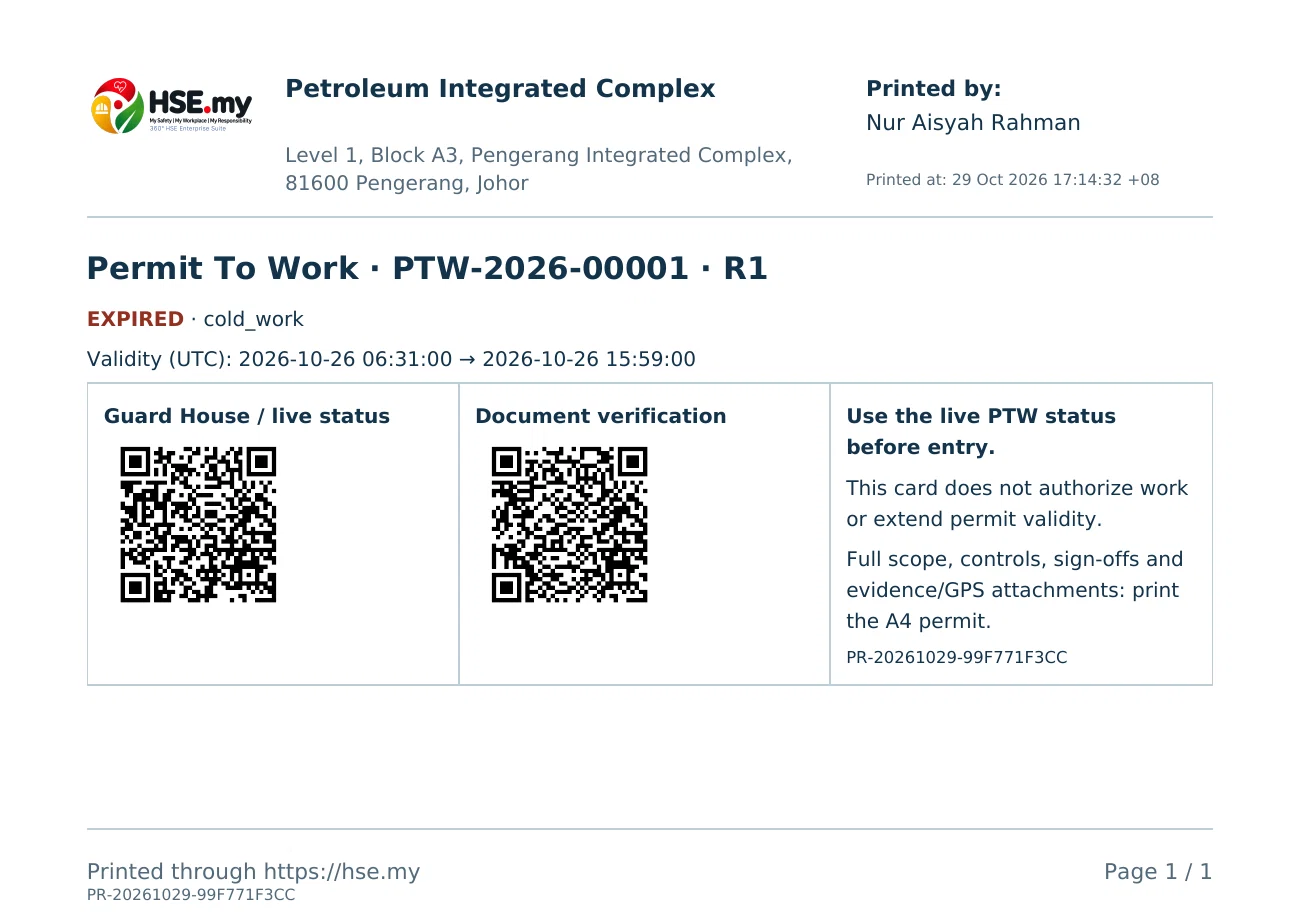
  1. Choose Print / PDF in the record header.
  2. Select the permit format for the field copy or open the package record to print the work package.
  3. Scan the document verification QR to check the reference and revision.
Sample PTW printout in A6 format

Operations

Register equipment and manage certificates

STEP 1 OF 3

Register the asset

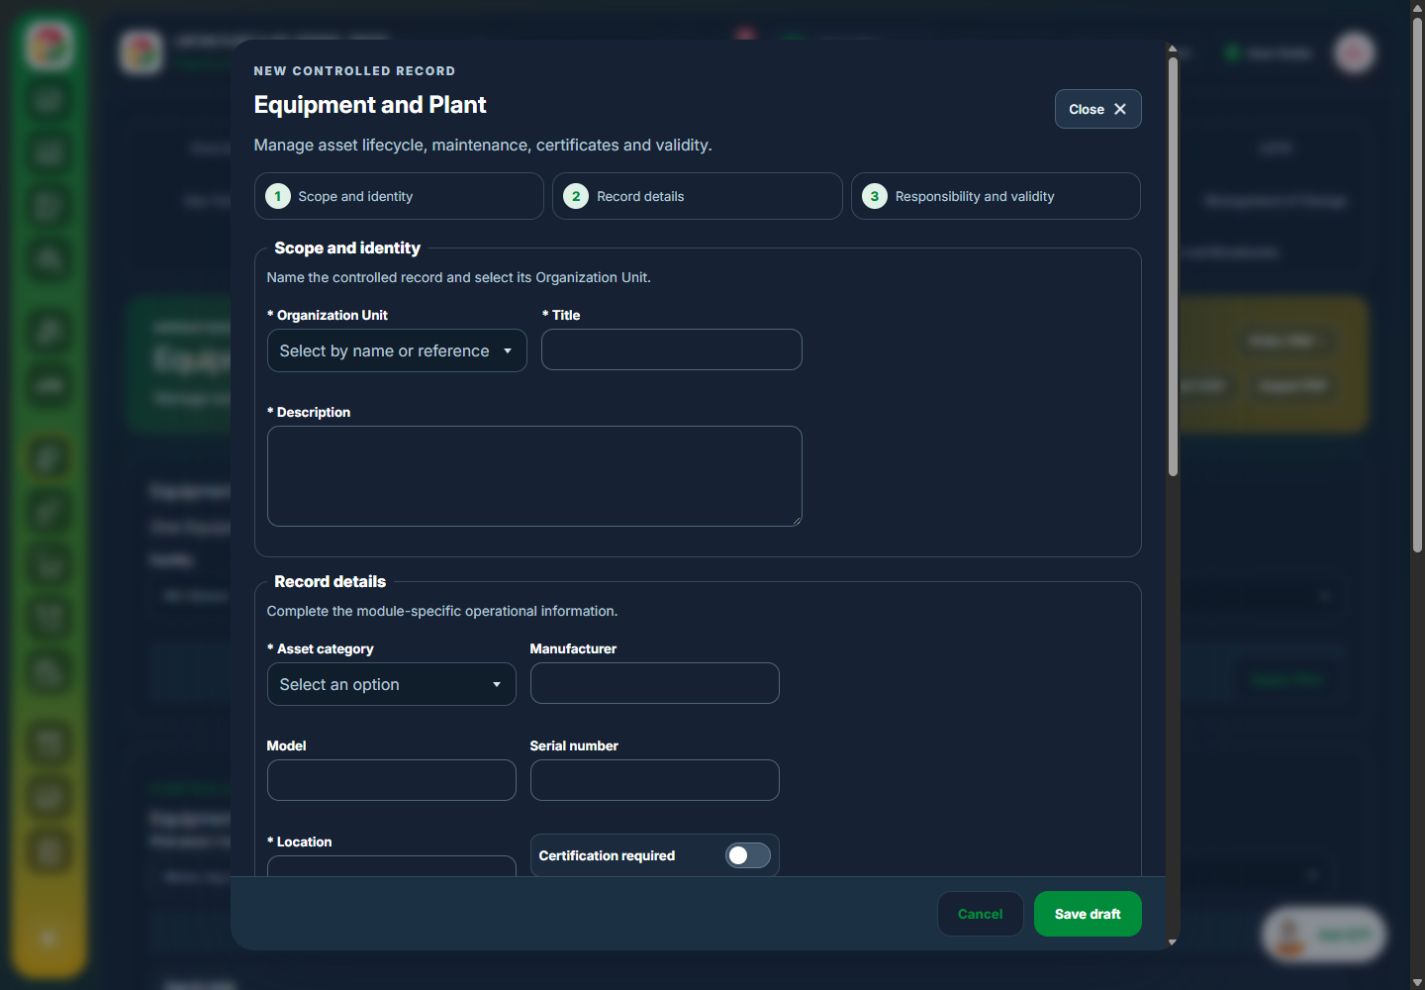
  1. Open Operations → Equipment and Plant.
  2. Create the equipment record, select its category, enter its identifier, then assign its unit, site and responsible person.
  3. Save and open the asset record.
Add equipment · Entry form with Close in the header

STEP 2 OF 3

Record certification and reminders

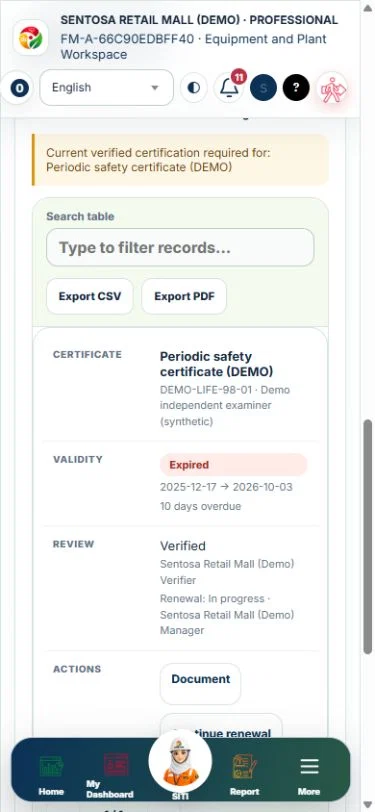
  1. Open Certificates & renewals.
  2. Record the required certificate type, issuer, certificate number, validity dates and supporting document.
  3. Check the assigned PIC and reminder settings.
  4. Submit the certificate for verification and check its status before relying on it.
Certificate register and history

STEP 3 OF 3

Renew and verify the replacement

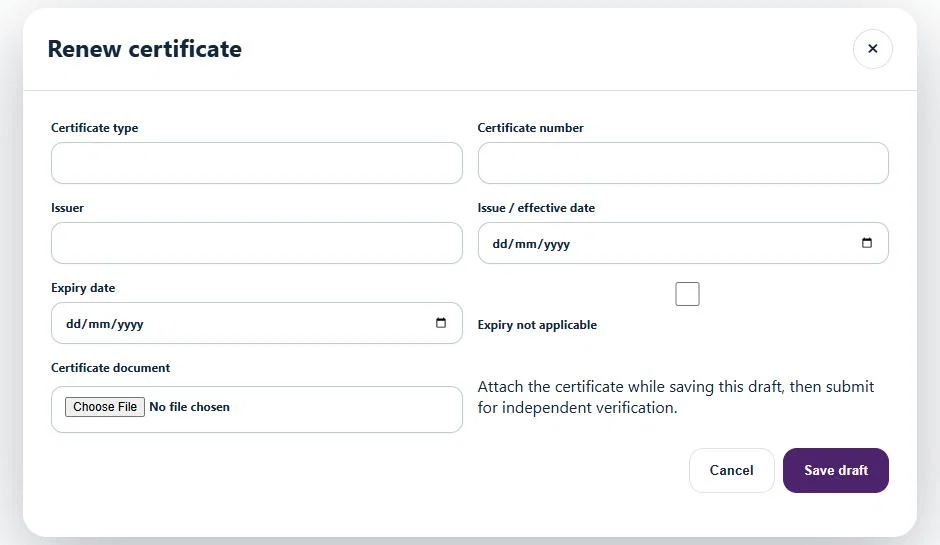
  1. Open the expiry reminder in My Actions or the current certificate in the asset record.
  2. Choose Renew certificate or Continue renewal.
  3. Enter the new details, upload the replacement and submit for independent verification.
  4. Check the effective date and the previous certificate in the history.
Replacement certificate form

MOBILE · FIELD WORK

Report, check and verify from your phone

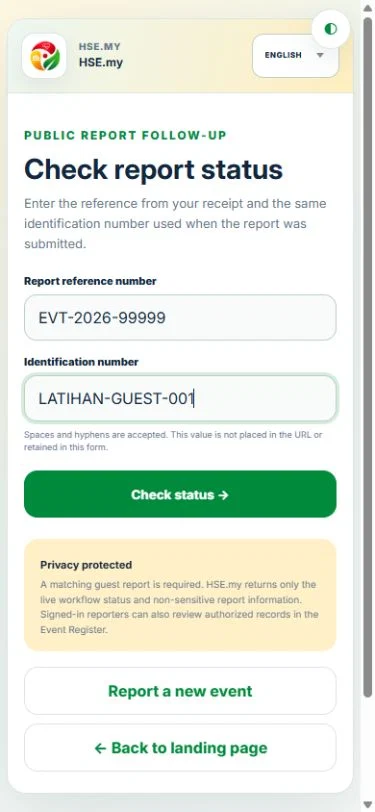
Choose Report an event to record the location and attach evidence at the scene. Keep the report reference. Use Check report status to follow up.

Mobile · Attach evidence to the event report
Mobile · Check the status of a report

Check a permit at the gate

Open Guard House and scan the permit QR. Read the current validity and work-party status before recording entry. Record exit when each worker leaves.

Mobile · Scan the permit QR
Mobile · Check the verification result
Mobile · Record worker entry

Check equipment certificates on mobile → · Find Close and Print / PDF in a mobile modal →

UPDATED WORKFLOWS

Simpler daily work

Start with the current step, complete outstanding items and use the next permitted action. Existing approvals, evidence and audit history stay with each record.

NOTIFICATIONS

Choose your notification preferences

Open Actions → My notification preferences. Choose Enabled and Minimum priority for each available channel, then Save preferences. Settings apply to your current organization.

Email timing

Immediately sends on the next worker run. Daily combines eligible updates into one digest at 08:00; Weekly combines them on Monday at 08:00, in your organization time zone. Each item includes its reference, notification-time status and an Open action link. Sign in to view the latest record and complete the action; normal access permissions still apply. Empty digests are not sent. High and critical alerts bypass the schedule when email is enabled. Turning email off also stops queued workflow alerts.

In-app and device alerts

In HSE Overview, select a My Deadline card to open Overdue, Due today, Ends within one hour or Upcoming in My Actions. Register this device under PWA push and allow notifications. In-app alerts are immediate; critical alerts remain visible. PWA push requires the administrator’s push service configuration and permission on each device. An unavailable push button means setup is incomplete.

Account and safety messages

Account invitations, email verification and report receipts are transactional and remain available. WhatsApp Business consent and delivery are temporarily disabled. Existing consent records are retained.

Administrators must run the site scheduler every minute and configure mail delivery. Notification operations shows queued, sent, failed and cancelled records; “sent” means accepted by the configured mail service, not proof of inbox delivery.

STARTER PROMOTION

Two months of Professional functions

Starter organizations on the production site receive Professional feature access for two calendar months from enrolment. On demo.hse.my, Starter accounts use Starter functions and allowances only, with no Professional promotion or countdown. Self-registration enrols when the email is verified. The account remains Starter with one HSE and two non-HSE seats; existing contractor account allowances also remain unchanged.

Check your remaining days

The dashboard and workspace notice show the remaining days and exact end time in your organization time zone. Open Package & usage to see the current allowances.

Use the existing team

Invite Operations and an Independent Reviewer from Team & workers, or let an Organization Administrator assign Professional roles from Administration → Users. Access still depends on roles, unit scope and workflow requirements. Self-approval stays blocked.

When the promotion ends

Starter functions and normal allowances apply automatically. Existing data is kept; upgrade to use Professional functions again. Exceeding a normal allowance blocks additional creation rather than deleting existing records. Login or changing subscription dates does not restart the promotion.

PRINT / PDF · ALL INDUSTRIES & MODULES

Print records and verify documents

Use the same header action for controlled forms, summaries and available table exports. Public recipients can scan the document verification QR on an issued PDF or hard copy.

3. Public verification: scan the document QR

  1. Use a phone camera or QR reader to scan the QR labelled for document verification on the PDF or printed form. Keep the whole code in view and open the detected link.
  2. Check the destination before relying on the result. Hosted HSE.my document links use https://hse.my/verify/document/…. For another deployment, confirm the host with the issuing organization. A localhost link is for that local installation and cannot be opened by the public from another device.
  3. The Document verification page opens. Ordinary document verification does not require an HSE.my account or sign-in. Restricted clinical documents instead show Authorized access required; an authorized user must sign in to the appropriate organization and scan again.
  4. Read the result first. Compare Document type, Reference, Revision, Status when printed, Print ID, Printed at and Pages against your copy. Checked at is the time of the current check. “Status when printed” describes the issued copy, not a new workflow decision.
  5. If any reference or Print ID differs, or the result asks for a current print, contact the issuing organization with the reference and Print ID. Ask them to review the source record and provide the appropriate current output.

Document QR

Identifies the issued PDF and checks the stored file’s integrity and, for controlled records, whether the source has changed. The public result shows limited verification metadata; it does not provide access to the full workspace, PDF, evidence or GPS attachments.

PTW operational / Guard House QR

Used for live permit status, access and readiness checks by the guard. A PTW card can carry both codes. Document verification never grants site entry, activates PTW, approves work or closes a workflow. Use the operational QR and the Guard House process for those checks.

What does Issued PDF SHA-256 mean?

This is the fingerprint of the exact PDF issued by HSE.my. For a digital copy, calculate its SHA-256 with a trusted file-hash tool and compare all characters with the value on the verification page. A QR can be copied onto another file or sheet; scanning it alone does not prove that every part of your copy is unchanged.

The page does not upload or automatically compare your local file. A paper copy cannot be hashed. For hard copy, compare the displayed identifiers and request the original issued PDF if there is doubt.

4. Understand the verification result

Issued document found - source unchanged
The issued PDF is available with matching stored integrity, and the tracked source has not changed. Still compare the reference, revision and Print ID with your copy. This is not an approval or live site-access decision.
Issued report snapshot found - source data is not re-evaluated
This is an issued report snapshot. Its source data is not checked again for currency. Use its printed date and reporting scope; request a fresh report if current figures are required.
Source changed - obtain a current print
The source has changed since this copy was issued. Ask the record owner for a current print and check its new QR.
This printed document has been revoked
This issued copy has been withdrawn. Ask the issuer for the appropriate replacement before relying on it.
Document integrity could not be confirmed
The system cannot confirm the stored issued PDF’s integrity. Ask the issuer to investigate and provide a verifiable document.
Document unavailable
The link is invalid or no issued document matches it. Rescan the correct document QR; if the result remains, contact the issuer. Do not treat an unavailable result as verification.
Authorized access required
The document is restricted. No document details are disclosed on this result. Sign in only with an appropriately authorized account in the issuing organization, then scan again; otherwise contact the issuer.
If Print / PDF or the QR does not work
  • Open a saved record and check the top of its workspace or Detail popup. If an expected option is missing or disabled, check your role, scope, package and record state with your administrator. A draft or returned PTW cannot be printed as an issued permit.
  • If the browser blocks the PDF tab or download, allow it for the trusted HSE.my site and try again. Printing failure does not undo a previously saved record.
  • If scanning fails, try the original PDF at a readable zoom or a clearer print. If the verification page cannot load, check connectivity and the link’s host. A connection failure is not a verification result.

HELP & SUPPORT

Support tickets

Available after login on every package. Open Help & Support from the workspace header. There is no guest ticket submission.

Submit a request

Choose a category, enter a subject and describe the problem. Your account and organization are linked automatically. Add a workspace path and an optional PDF, PNG or JPEG up to 5 MB. Never send passwords.

Follow the conversation

My tickets shows only your own requests in the current organization. Open a ticket to reply or upload evidence. Support messages come from HSE.my Support <support@hse.my>. When email piping is configured, reply to that email without changing its ticket reference. New tickets must be created after login.

Resolve and reopen

Open → In progress → Waiting for user → Resolved → Closed. A user reply returns a waiting ticket to In progress. Confirm resolved to close, or reopen a resolved/closed ticket when more help is needed.

SaaS administrators

Open SaaS Administration → Support Tickets. Filter requests by organization, category or status; assign an active SaaS administrator, set priority, reply or add an internal note. Internal notes and their attachments never appear to customers. Supply a resolution before marking Resolved. Email delivery counts and failed-email retry are provided.

GUIDES BY INDUSTRY

Choose your industry

Follow the workflow for your operation, then open the linked module guide for detailed source actions.

Dedicated workspace

Facilities & Property Management

Properties, locations, defects, maintenance, occupiers and asset availability.

Read industry guide →
Dedicated workspace

Construction & Infrastructure

Projects, CDM, design risks, site work, SHASSIC and project handover.

Read industry guide →
Dedicated workspace

Manufacturing & Engineering

Factories, machine safeguards, operator authorization, production and maintenance release.

Read industry guide →
Dedicated workspace

Oil, Gas & Petrochemicals

Six editions: Contractor, Plant & Terminal, Upstream & Offshore, Midstream, Upstream Onshore and Retail & Pump Station, with shared HSE records.

Read industry guide →
Dedicated workspace

Logistics, Warehousing & Distribution

Journeys, loading bays, vehicle movement, storage, racking and cold-chain work.

Read industry guide →
Dedicated workspace

Education & Research

Laboratories, workshops, fieldwork, research, campus events and residences.

Read industry guide →
Dedicated workspace

Hospitality, Tourism & Food Services

Guest areas, kitchens, housekeeping, pools, water hygiene, events and occupied-site maintenance.

Read industry guide →
Dedicated workspace

Agriculture, Plantation & Livestock

Pesticides, machinery, heat exposure, remote workers and animal handling.

Read industry guide →
Dedicated workspace

Waste Management & Recycling

Waste handling, segregation, vehicles, exposure and spill response.

Read industry guide →
Dedicated workspace

Water & Wastewater

Confined spaces, treatment chemicals, biological exposure and monitoring.

Read industry guide →
Dedicated workspace

Energy & Power Utilities

Power Generation, Transmission & Distribution, Renewable Energy & Storage with shared HSE source records.

Read industry guide →
Dedicated workspace

Retail & Wholesale Operations

Retail, wholesale and chain profiles: outlet readiness, customer safety, racks, cold chain, product traceability and recalls.

Read industry guide →
Dedicated workspace

Healthcare & Aged Care

Staff exposure, sharps, biological hazards, clinical waste and facility maintenance.

Read industry guide →

View all 22 industry guides →

START HERE

One controlled way of working

Use the register to find work, the workspace to perform controlled actions, and CAPA to manage corrective action.

Fewer screens, clear next actions

New controlled records open directly in their workspace. Case navigation groups related sections; choose the visible next action and expand passed checks or history when needed. Independent decisions and source evidence remain required.

Use the owning workspace

Open Workspace is the source of truth for a controlled record. Do not run a parallel spreadsheet or duplicate action tracker.

RBAC and organization-unit scope apply

A button appears only when your active role, organization-unit scope and workflow stage permit the action.

Protect controlled history

Delete only an unused draft where the module explicitly permits it. Submitted, approved, linked, printed or evidenced records use amendment, revision, void, retire, archive or supersede.

CAPA is authoritative for actions

Create or link CAPA from a source when corrective work is needed; do not create a duplicate action tracker in another module.

NEED HELP?

Share the record reference, workspace URL and displayed error reference.

Do not include restricted medical, identity or personal data in a support request.

Open HSE.my sign in →